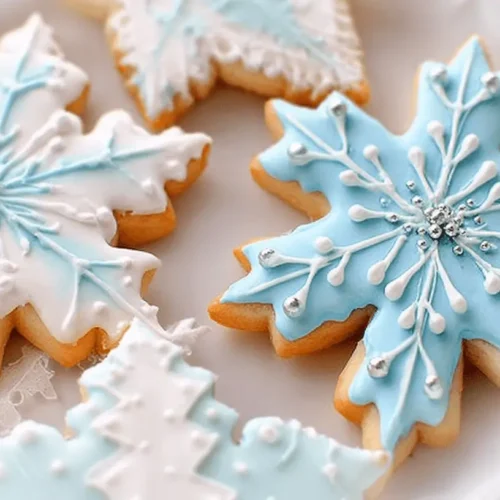
Festive & Flavorful Snowflake Cookies
Create beautiful and delicious Festive & Flavorful Snowflake Cookies with this detailed recipe. These classic sugar cookies, adorned with homemade royal icing, are perfect for holiday celebrations and special occasions.
Equipment
- Sifter
- Large mixing bowls
- Electric mixer (with paddle attachment)
- Wax paper
- Cookie cutters
- Baking trays
- Parchment paper
- Piping Bags
- Round metal tips
Ingredients
Sugar Cookies
- 3 cups all purpose flour
- ¼ tsp baking soda
- ½ teaspoon salt
- 1 cup unsalted butter softened
- 1 cup sugar
- 1 large egg
- 1 1/2 teaspoons vanilla
Royal Icing
- 1 pound confectioners sugar
- ¼ cup meringue powder
- ½ tsp cream of tartar
- ½ cup water
- 1 tsp clear vanilla
- Gel food coloring
Instructions
Sugar Cookies
- Sift together flour, baking soda, and salt; then set aside.
- Cream butter and sugar, then beat in the egg until combined.
- Gradually add the sifted flour mixture in two batches, blending until the dough just comes together.
- Mix in the vanilla extract.
- Roll out the dough between wax paper sheets and cut into desired shapes using cookie cutters.
- Transfer cut shapes to parchment-lined baking trays and freeze for 10 minutes before baking.
- Bake at 350°F (175°C) for 8-12 minutes, or until edges are lightly golden, adjusting time based on cookie size.
Royal Icing
- In a large bowl, combine confectioners sugar, meringue powder, cream of tartar, water, and clear vanilla. Beat on high speed with a paddle attachment until stiff peaks form, adding more water by the teaspoon if a thinner piping consistency is desired.
- Incorporate gel food coloring to achieve your desired shade, noting that the color will intensify as the icing dries.
Decorate the Cookies
- Divide the royal icing into two consistencies (thinner for flooding, thicker for detailing), fill piping bags with round metal tips, and ice the cookies.
- Allow the base icing to dry for a few hours before piping designs.
- Let the decorated cookies dry completely for at least 12 hours before storing them in airtight containers.
- Store cookies at room temperature in airtight containers; they will remain fresh for several days.
Notes
For best results, remember that gel food coloring will deepen as the icing dries. Allow the flood icing base to dry for a couple of hours before piping intricate designs. Ensure cookies are fully dry for at least 12 hours before storing in airtight containers to prevent smudging and maintain freshness. Stored at room temperature, these cookies will keep for several days.