

Get ready for some truly monstrous fun in the kitchen this Halloween! Our Marshmallow Rice Krispies Halloween Brains are a no-bake wonder, perfect for creating a deliciously spooky treat with minimal effort. This recipe is designed to be simple, family-friendly, and offers a fantastically gross-out factor that everyone will love. Let’s make some creepy, crispy brains!
Table of Contents
Why You’ll Love These Marshmallow Rice Krispies Halloween Brains
- Minimal Ingredients: You only need a few basic pantry staples to bring these eerie brains to life. Simple components mean less shopping and more fun.
- Quick to Make: From start to finish, you can have a batch of these spooky treats ready in under 20 minutes. They’re perfect for last-minute party prep.
- No-Bake Ease: No oven required for these Marshmallow Rice Krispies Halloween Brains, making them ideal for all skill levels, even the littlest helpers. This recipe is wonderfully beginner-friendly.
- Festive Fun: These creepy creations are absolutely perfect for Halloween parties, school events, or just a fun afternoon activity with the kids. They add a real “wow” factor to any celebration.
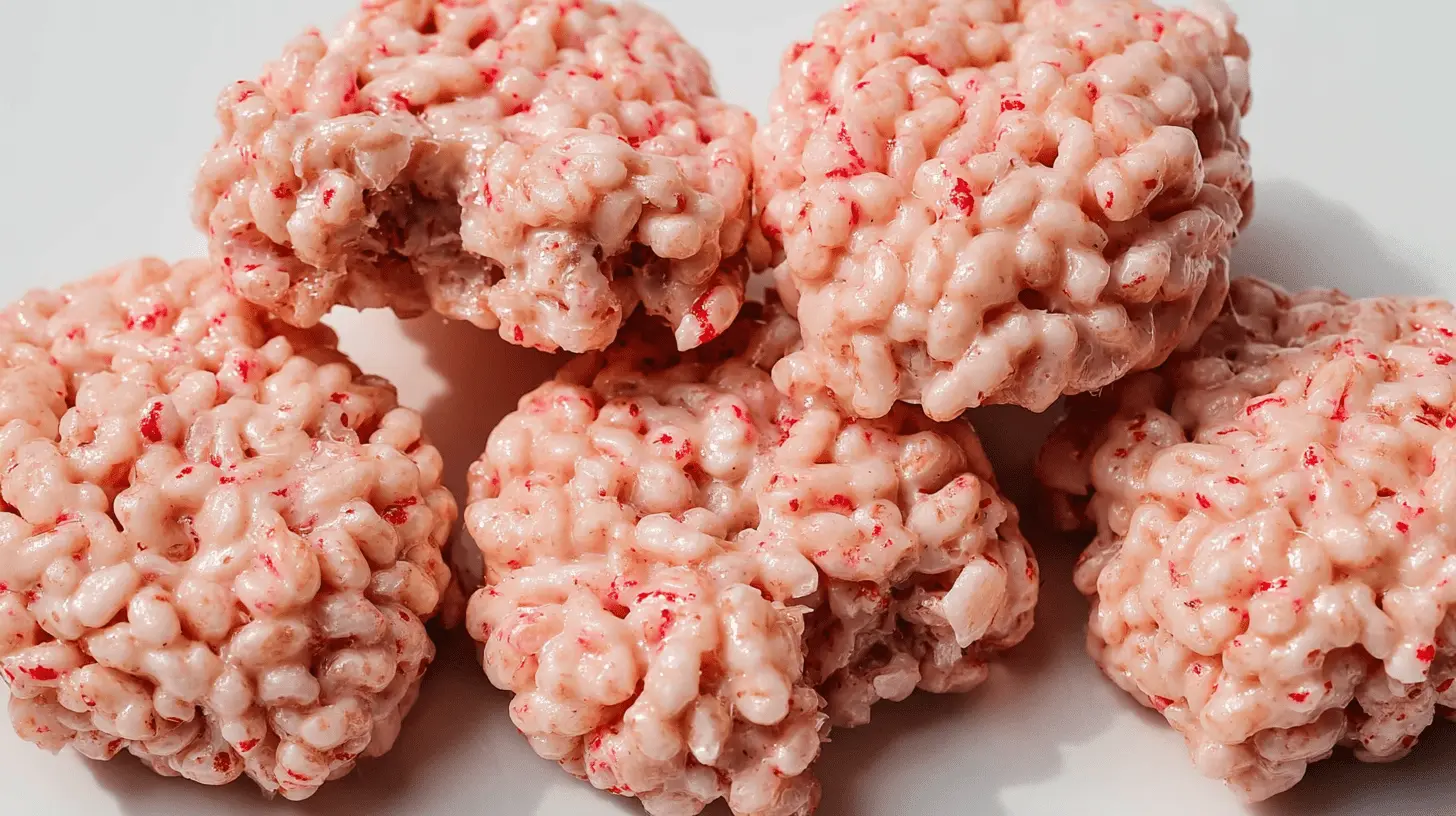
- Spooky Realism: With their distinctive shape and gory red veins, these crispy brains offer a deliciously unsettling appearance that will delight and disgust guests in equal measure.
- Perfect Texture: Enjoy that classic crispy, chewy, and sweet combination that everyone loves in a Rice Krispies treat. They’re soft on the inside with a satisfying crunch.
Ingredients
Here’s everything you need to create your horrifyingly delicious Marshmallow Rice Krispies Halloween Brains:
- 85 g unsalted butter
- 6 cups regular marshmallows
- 4 cups Rice Bubbles (Krispies) cereal
- ½ tsp salt
- Red food coloring (as needed for desired color)
Notes & Substitutions
For the butter, if you only have salted butter on hand, you can absolutely use it. Just omit the additional ½ teaspoon of salt from the recipe to balance the flavors. When it comes to marshmallows, either regular-sized or mini marshmallows will work beautifully. Mini marshmallows melt a bit faster, but both will yield the same delicious result for your spooky brains. If you’re not in a region that calls it Rice Krispies, “Rice Bubbles” is a common alternative. Finally, for the red food coloring, gel food coloring is highly recommended. It provides a much more vibrant and concentrated color with just a tiny amount, giving you truly gruesome and realistic Halloween brains.
Instructions
Creating these Marshmallow Rice Krispies Halloween Brains is super easy! Follow these steps for perfect, spooky treats:
- Prepare the Workspace: Begin by lining a large baking sheet with parchment paper or a silicone mat. This prevents sticking and makes cleanup a breeze. Next, prepare a Bain-Marie (double boiler) by pouring about ½ cup of water into a small saucepan and bringing it to a gentle boil over medium heat. Place a large, heatproof bowl snugly over the pot, ensuring the bottom of the bowl does not touch the water.
- Melt the Base: Add the unsalted butter and 6 cups of regular marshmallows into the heatproof bowl over the simmering water. Allow the butter and marshmallows to melt slowly and evenly.
- Whisk to Smooth: continually whisk the butter and marshmallows until they are completely melted and form a smooth, glossy paste. This usually takes around 2–4 minutes. Don’t rush this step for the best texture.
- Add Color and Salt: Carefully remove the heatproof bowl from the pot using oven mitts or a tea towel, as it will be hot. Stir in the ½ teaspoon of salt and a few drops of red food coloring. Whisk thoroughly until the color is evenly distributed and you achieve your desired ghastly hue for the marshmallow mixture.
- Combine Cereal: In a separate large mixing bowl, measure out the 4 cups of Rice Bubbles cereal. Pour the warm marshmallow mixture directly over the cereal.
- Mix Quickly: Using your whisk or sturdy spatula, stir the mixture quickly but gently. Ensure all the cereal is thoroughly coated with the gooey, red marshmallow base. Work fast before the mixture cools too much.
- Cool Slightly: Let the mixture cool for just a minute or two. This brief cooling period makes the mixture easier to handle and shape without being too sticky or hot.
- Shape the Brains: Lightly oil your hands with a neutral cooking oil or butter. Scoop out portions of the Rice Krispies mixture and form them into rough oval shapes, about the size of a small brain. Place each shaped brain onto your prepared baking sheet.
- Create Indentation: While the brain shapes are still warm and pliable, use the side of a butter knife to gently press a central dent down the middle of each oval. This creates the characteristic two-hemisphere look of a brain.
- Draw Veins: Dip the tip of a toothpick into a small amount of additional red food coloring. Carefully draw squiggly lines and delicate “veins” across the surface of each brain, especially along the central indentation. Get creative with your gory details!
- Set and Store: Allow your Marshmallow Rice Krispies Halloween Brains to set completely at room temperature for about 30 minutes before serving. Once firm, store them in an airtight container for optimal freshness.
Pro Tips for Perfect Halloween Brains
- Melt Marshmallows Gently: Always use a double boiler or very low heat on the stovetop to melt your marshmallows. This prevents scorching, which can make your treats hard and not chewy. A slow melt ensures a smooth, pliable base for your spooky brains.
- Mix Quickly: Once you add the cereal, stir immediately and efficiently. The marshmallow mixture cools and stiffens fast, so an even coating requires swift action.
- Oil Your Hands: This step is crucial! Lightly oiling your hands before shaping is essential for preventing the sticky mixture from clinging to you. Re-oil as needed.
- Adjust Gory Details: Start with a few drops of red food coloring for the base and add more until you reach your desired shade of “gore.” For the veins, a little coloring on a toothpick goes a long way for realistic detail.
- Temperature Matters: Let the mixture cool for just a minute after mixing the cereal. It should be warm enough to handle comfortably but not scorching hot. This makes shaping much easier for your Halloween brains.
- Batch Size: This recipe yields about 14 brains. If you’re hosting a larger party, easily double or triple the ingredients to make sure everyone gets a deliciously creepy treat.
Serving, Storage, and Variations
These Marshmallow Rice Krispies Halloween Brains are a versatile and fun treat for any spooky occasion!
Serving Suggestions
These gory brain treats make a fantastic centerpiece for any Halloween party dessert table, guaranteed to spark conversation. Pack them as a spooky surprise in school lunches, or hand them out to trick-or-treaters for a homemade touch. For an extra gruesome presentation, serve them on a platter with a drizzle of raspberry syrup or cherry pie filling to mimic extra “blood.”
Storage
To keep your Marshmallow Rice Krispies Halloween Brains at their best, store them in an airtight container. They can be kept at room temperature for up to 3 days, or refrigerated for up to 1 week. If refrigerating, let them come to room temperature for about 15-20 minutes before serving for the chewiest texture.
Variations
- Edible Googly Eyes: For a truly monstrous touch, press a few edible googly eyes onto your finished brains before they set.
- Chocolate Drizzle: Drizzle with melted white or dark chocolate for contrast, or even green-tinted white chocolate for a zombie brain effect.
- Glow-in-the-Dark: Some specialty food dyes are designed to glow under blacklight, adding another layer of spooky fun.
- Different Colors: Why stick to red? Experiment with green, purple, or even black food coloring for a variety of creepy brain hues.
- Flavor Extracts: Add a teaspoon of vanilla, almond, or even a spooky “blood orange” extract to the melted marshmallow mixture for an extra burst of flavor.
Nutrition Information
Here’s the nutritional breakdown for one serving of our Marshmallow Rice Krispies Halloween Brains:
| Nutrient | Amount |
|---|---|
| Servings | 14 |
| Calories | 149 |
| Total Fat | 5g |
| Sodium | 197mg |
| Potassium | 11mg |
| Carbohydrate | 25.8g |
| Protein | 1.1g |
Frequently Asked Questions (FAQ)
Can I use mini marshmallows instead of regular ones?
Yes, absolutely! Mini marshmallows can be used in the same quantity (by volume) as regular marshmallows. They will melt slightly faster, so keep an eye on them.
How do I make the “veins” look more realistic?
For more realistic veins on your Marshmallow Rice Krispies Halloween Brains, use a very fine tip (like a clean toothpick or food-safe paintbrush). Dip it lightly in gel food coloring and create thin, squiggly, branching lines, focusing on the crevices.
Can these be made ahead of time for a party?
Yes, these Halloween treats are perfect for making ahead! You can prepare them up to 2-3 days in advance and store them in an airtight container at room temperature for optimal freshness.
Is it safe to use lots of food coloring?
The FDA provides comprehensive information regarding the safety and regulations of food color additives. When using food coloring, always choose food-grade dyes. While a vibrant color might require a bit more, follow the manufacturer’s guidelines. Gel food coloring provides intense color with less product.
Conclusion
There you have it – a perfectly spooky, deliciously easy recipe for Marshmallow Rice Krispies Halloween Brains! This no-bake treat is not only incredibly simple to whip up, but it also delivers maximum impact with its fun, creepy appearance. They’re sure to be a hit with both kids and adults, making your Halloween celebrations extra special. Don’t hesitate to give these ghoulishly good brain treats a try this year. Share your creations in the comments below – we’d love to see your spooky masterpieces!
Ghoulishly Good Marshmallow Rice Krispies Halloween Brains
Equipment
- Small Pot
- large heatproof bowl
- whisk
- oven mitts/tea towel
- Large Mixing Bowl
- butter knife
- Toothpick
- airtight container
Ingredients
Main Ingredients
- 85 g unsalted butter
- 6 cups regular marshmallows
- 4 cups Rice Bubbles (Krispies)
- ½ tsp salt
- red food colouring
Instructions
Preparation
- Set up a Bain-Marie by boiling 1/2 cup of water in a small pot and placing a large heatproof bowl over it.
- Add butter and marshmallows to the heatproof bowl and whisk continuously until a smooth paste forms, which takes about 2-4 minutes.
- Carefully remove the bowl from the pot, then add salt and red food coloring, whisking until combined.
- Transfer Rice Bubbles to a large mixing bowl, pour the marshmallow mixture over them, and mix well to ensure all Rice Bubbles are coated.
- Oil your hands, shape the mixture into ovals, create a dent in the center with a butter knife, and use a toothpick dipped in food coloring to draw veins. Store in an airtight container for up to a week.


