

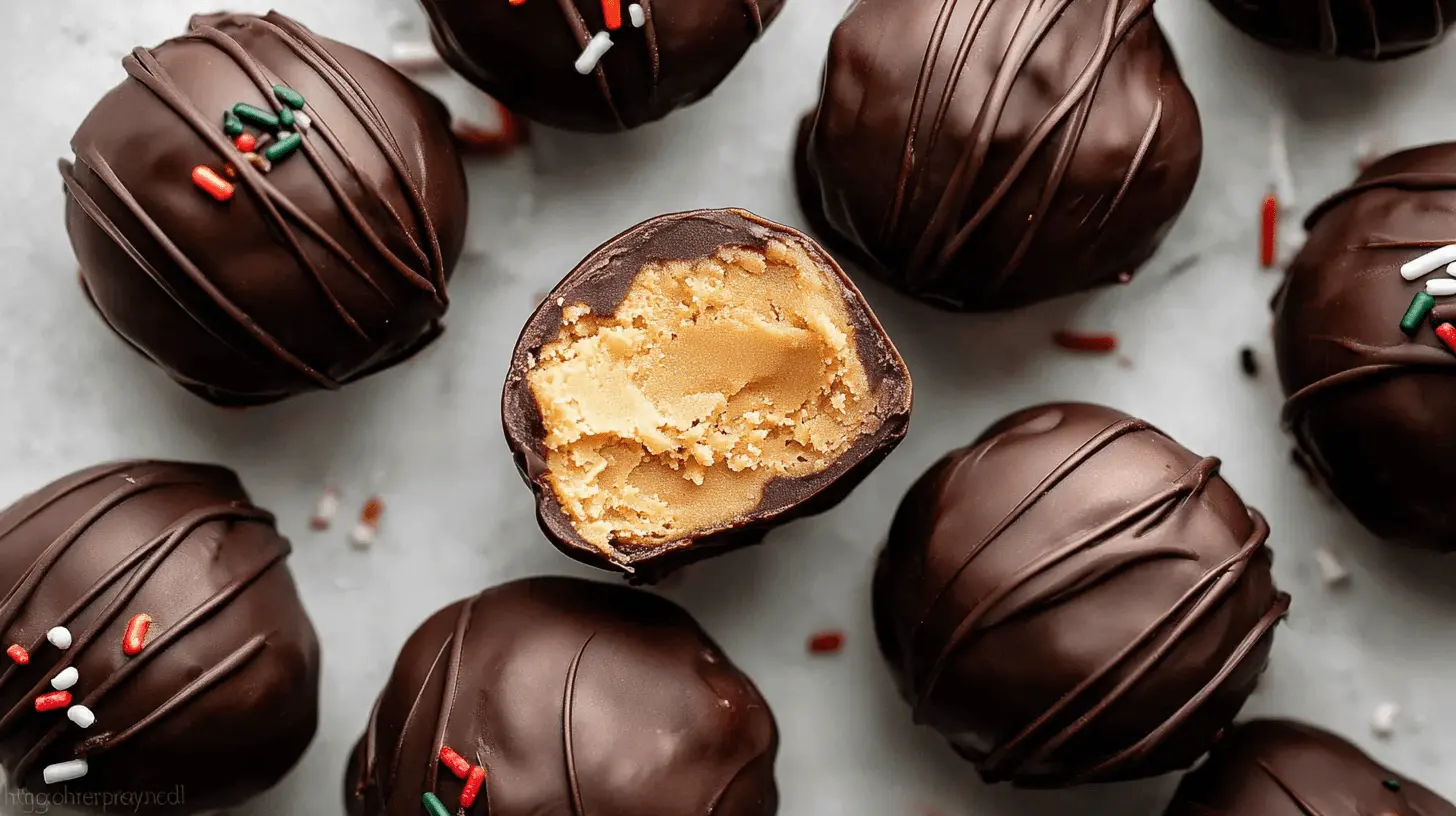
These treats bring together a rich chocolate shell and a soft, creamy peanut butter center in minutes. No oven is required, just a little chill time. With simple pantry staples, you can whip up a batch that tastes like a classic candy bar but without the fuss. Think Reese’s vibes, but homemade and more forgiving. Perfect for busy parents and baking beginners alike, these Peanut Butter Balls (Truffles) are a crowd-pleaser any time of year.
Table of Contents
Why You’ll Love This Peanut Butter Ball Recipe
- Soft, creamy filling that melts in your mouth.
- Rich, smooth chocolate coating stays glossy.
- Easy, no-bake method saves time and energy.
- Great for holidays, parties, or simple weeknight treats.
- Make ahead and freeze for effortless gifting or quick dessert.
These little rounds offer reliable texture and flavor without complicated steps. They’re forgiving if you’re new to candy-making, and you can tailor sweetness with the coating choice or toppings.
Ingredients
Key Ingredients
Peanut Butter Balls
- 6 Tablespoons unsalted butter, softened to room temperature (85g)
- 1 cup creamy peanut butter (250g) (not natural style)
- 2 1/2 cups confectioners’ sugar (300g)
- 1/2 teaspoon pure vanilla extract
- 1/8 teaspoon salt
Chocolate Coating
- 12 ounces semi-sweet chocolate bars (three 4-ounce bars) (339g), coarsely chopped
- 1 teaspoon vegetable oil (see Note)
- optional sprinkles for topping
Notes & Substitutions
Butter: Salted butter works fine if you don’t have unsalted.
Peanut Butter: Avoid natural peanut butter here for a sturdier filling.
Chocolate: You can use baking bars or melting wafers.
Oil: Vegetable oil is preferred; coconut oil also works.
Optional: Sprinkles, mini chocolate chips (reduce sugar), or crushed Rice Krispies (reduce sugar accordingly).
Understanding the difference between processed and natural peanut butter can be crucial for achieving the desired texture in no-bake treats. For more information on why processed peanut butter is often preferred in recipes like this, consider this resource about the distinction between natural and processed peanut butter.
Step-by-Step Instructions
Preparing the Peanut Butter Filling
- Line the baking sheet and set aside.
- Beat butter on medium-high speed until creamy, about 2 minutes.
- Add peanut butter and beat until combined, about 1 minute. If any butter chunks remain, don’t worry—the mixture will smooth out.
- Add confectioners’ sugar, vanilla, and salt; beat on low speed for 2 minutes until everything looks combined. The mixture will be a bit soft and crumbly at this stage.
- Roll the dough into 1-inch balls (about 1 scant tablespoon or 18 g each) and place on the lined sheet. Continue until you’ve formed 32–35 balls. The warmth of your hands helps bring the mixture together. If it becomes too soft to handle, chill for 15 minutes. For less stickiness, dust your hands with confectioners’ sugar.
- Chill the shaped balls in the refrigerator for at least 1 hour and up to 1 day. In the last few minutes of chilling, begin melting the chocolate and oil together.
Melting & Dipping the Chocolate
- Melt chopped chocolate with oil using a double boiler or microwave.
- If microwaving, place chocolate and oil in a medium heat-proof bowl or measuring cup. Melt in 20-second bursts, stirring after each interval, until smooth.
- Let the warm chocolate sit for 6–8 minutes to cool slightly before dipping; dipping too hot will soften your balls too quickly.
- Remove peanut butter balls from the fridge. Dip one at a time into the chocolate using a fork or spiral dipping tool. Tap the excess chocolate off gently. If using a fork, slide the coated ball off onto the sheet with a toothpick or second fork. If using a dipping tool, invert and rest on the sheet.
- Reheat any leftover chocolate if needed and drizzle over the tops or use a squeeze bottle for delicate designs. Add sprinkles while the chocolate remains wet.
- Refrigerate the coated balls for 30 minutes or until the chocolate is fully set before serving.
This sequence keeps the center intact while delivering a glossy chocolate finish.
Pro Tips & Troubleshooting
- Ensure butter is at room temperature for a smoother fill.
- Use processed, creamy peanut butter for stability.
- Choose high-quality baking chocolate bars for the best melt and flavor.
- Melt chocolate gently to prevent scorching and thick, clumpy coating.
- Let melted chocolate rest 6–8 minutes before dipping for a cleaner shell.
- Chill the balls thoroughly so they don’t lose shape during dipping.
- Have a candy-dipping tool on hand for quicker, cleaner coating.
- Work quickly when coating to minimize chocolate cooling and thickening.
These tips help you avoid common snags and yield a professional finish.
Storing, Making Ahead, & Variations
Storage Instructions
- Room temperature in an airtight container: up to 2 days.
- Refrigerator: up to 2 weeks.
- Freezer: up to 3 months.
- Best enjoyed straight from the refrigerator for a firmer bite.
For proper food safety and to ensure your homemade treats remain delicious, it’s important to understand the recommended storage durations and conditions for confectionery items. To learn more about extending the shelf life of your candy, consult this guide on candy shelf life and storage.
Make-Ahead Tips
- Shape and line the balls up to 1 day ahead; chill uncoated balls until ready to dip.
- Coating can be done in batches to keep chocolate from cooling too fast.
Flavor & Texture Variations
- Mix in mini chocolate chips or finely chopped nuts for crunch.
- Fold Rice Krispies into the filling for a lighter texture (adjust sugar to taste).
- Try different coatings: milk, dark, or white chocolate.
- Top with chopped nuts or crushed pretzels for extra contrast.
These variations let you customize Peanut Butter Balls (Truffles) for holidays, birthdays, or quick weeknight desserts.
Nutritional Information
Approximate per-serving values (per ball, 32–35 balls total). Calories: 110; Fat: 6 g; Carbohydrates: 12 g; Protein: 2 g. Values depend on exact sizes and toppings.
| Serving size | Calories | Fat (g) | Carbs (g) | Protein (g) |
|---|---|---|---|---|
| 1 ball | ~110 | ~6 | ~12 | ~2 |
Note: These are estimates based on standard ingredients. For precise data, check the specific brands you use.
FAQ
How long do I store Peanut Butter Balls (Truffles)?
They keep best in the refrigerator for up to 2 weeks, or in the freezer for up to 3 months. Store them in an airtight container.
Can I make ahead of time?
Absolutely. Shape and chill, then dip later. You can melt chocolate in advance and dip when ready.
Why is the melted chocolate thick or grainy on Peanut Butter Balls (Truffles)?
Thick chocolate often means the chocolate is too cool. Rewarm gently and whisk in a tad more oil or use a double boiler to smooth it.
Conclusion
Peanut Butter Balls (Truffles) prove that simple ingredients and a few steps can yield a show-stopping, no-bake treat. Their creamy centers, glossy coats, and forgiving process fit busy families and baking beginners alike. Make a batch for a party, a care package, or a cozy night in. Have fun experimenting with toppings and coatings, and share your experiences in the comments to inspire others. Enjoy the easy, comforting delight of this timeless favorite.

Easy No-Bake Peanut Butter Balls (Truffles)
Equipment
- Large baking sheet
- Parchment paper or silicone baking mat
- Handheld or Stand Mixer
- Paddle Attachment
- Medium heat-proof bowl or liquid measuring cup
- Fork or spiral candy dipping tool
- Toothpick (optional)
- Spoon or squeeze bottle (optional)
Ingredients
Peanut Butter Balls
- 6 Tablespoons unsalted butter, softened to room temperature (85g)
- 1 cup creamy peanut butter (250g) (not natural style)
- 2 1/2 cups confectioners’ sugar (300g)
- 1/2 teaspoon pure vanilla extract
- 1/8 teaspoon salt
Chocolate Coating
- 12 ounces semi-sweet chocolate bars (three 4-ounce bars) (339g), coarsely chopped*
- 1 teaspoon vegetable oil (see Note)
- optional sprinkles for topping
Instructions
Instructions
- Line a large baking sheet with parchment paper or a silicone baking mat and set it aside.
- Beat softened butter until creamy, then add peanut butter and beat until combined. Mix in confectioners’ sugar, vanilla, and salt on low speed for 2 minutes until combined; the mixture will be soft and crumbly.
- Roll the peanut butter mixture into 1-inch balls, about 32–35 total, and place them on the prepared baking sheet. If the mixture becomes too soft, chill it briefly or powder your hands with confectioners’ sugar.
- Chill the shaped peanut butter balls for at least 1 hour. Meanwhile, melt chopped chocolate and vegetable oil in a microwave or double boiler, then let it cool slightly for 6–8 minutes to prevent melting the balls.
- Remove the chilled balls, submerge each into the cooled melted chocolate, and gently tap to remove excess before transferring back to the baking sheet. Optionally, reheat leftover chocolate to drizzle on top and add sprinkles while the chocolate is still wet.
- Refrigerate the coated peanut butter balls for 30 minutes until the chocolate is fully set before serving.
- Store the finished balls in an airtight container at room temperature for 2 days or in the refrigerator for up to 2 weeks.


