

Get ready to conjure up some magic in your kitchen this Halloween! This Witch’s Brew Fudge recipe is the ultimate festive treat. It’s incredibly easy to make, requires no baking, and brings vibrant spooky colors to your dessert table. With simple steps and fun decorations, you’ll have a delightful, eerie confection ready in no time.
Table of Contents
Why You’ll Love This Witch’s Brew Fudge
This recipe is a Halloween dream come true for busy parents and beginner bakers alike. Here are just a few reasons why you’ll adore making this vibrant Witch’s Brew Fudge:
- Super Easy, No-Bake: Forget complicated oven times. This simple recipe comes together quickly on the stovetop.
- Perfect for Halloween Parties: Its striking colors and spooky decorations make it a showstopper for any gathering.
- Customizable Spooky Colors: Easily change the green and purple to match your preferred ghostly palette.
- Fun Activity with Kids: Little hands can help crush cookies and sprinkle on decorations for a memorable experience.
- Delicious Sweet Treat: Beyond its festive look, this fudge is wonderfully creamy and satisfyingly sweet.
Ingredients
To create this enchanting Witch’s Brew Fudge, you’ll need just a few key ingredients. Choose good quality options for the best flavor and texture in your homemade fudge.
- 500g White Chocolate: Use high-quality chips or finely chopped bars for smooth melting.
- 397g Can of Sweetened Condensed Milk: This creates the creamy, rich base for your fudge.
- 1 Packet of Oreos (approx. 14 cookies): These add a delightful crunch and dark contrast to the vibrant colors.
- Green Gel Food Coloring: Gel coloring provides intense, vivid hues.
- Purple Gel Food Coloring: Essential for achieving that classic spooky witchy vibe.
- Edible Candy Eyes: These are perfect for giving your fudge a playful, haunted look.
- Halloween Sugar Strands/Sprinkles: Add extra texture and festive sparkle.
Notes & Substitutions
Selecting the right ingredients ensures your Witch’s Brew Fudge turns out perfectly every time.
- Good Quality White Chocolate: This is crucial for a smooth, melt-in-your-mouth texture. Poor quality chocolate may seize or become grainy.
- Sweetened Condensed Milk is Key: Do not substitute with evaporated milk or regular milk, as it won’t set correctly.
- Swap Oreos: Feel free to use other dark cookies, like chocolate wafers, if you prefer.
- Liquid Food Coloring: While gel food coloring offers more vibrant results, liquid food coloring can be used. You may need a bit more to achieve desired intensity.
- Experiment with Other Spooky Candies: Try crushed candy corn, mini chocolate chips, or even gummy worms for different textures and decorations.
Equipment
Gathering your equipment before you start makes the process of creating this Witch’s Brew Fudge incredibly smooth. You likely have most of these items already in your kitchen.
- Medium Saucepan: For melting the chocolate and condensed milk base.
- Heat-Safe Mixing Bowls: Two bowls are needed to divide and color the fudge mixture.
- Rubber Spatula/Wooden Spoon: Essential for stirring and spreading.
- 8×8 Inch Square Baking Pan: The ideal size for a good thickness of fudge squares.
- Parchment Paper: This makes lifting the set fudge out of the pan effortless.
- Sharp Knife for Cutting: For clean, precise squares of your finished treat.
Instructions
Creating this colorful Witch’s Brew Fudge is a breeze with these step-by-step instructions. Follow along carefully to achieve perfectly swirled, spooky squares every time. This no-bake method makes it super accessible for beginners.
- Prepare Pan: First, line your 8×8 inch square metal baking tin with parchment paper. Leave an overhang on the sides, creating “handles” to easily lift the finished Witch’s Brew Fudge later. This prevents sticking and ensures clean removal.
- Melt Base: Then, place the entire can of sweetened condensed milk into a medium saucepan. Next, break up the white chocolate into smaller pieces and add them to the pan with the condensed milk. Turn on a very low heat.
- Stir Constantly: Of course, you then stir the mixture constantly with a rubber spatula or wooden spoon. Continue stirring gently until the chocolate is fully melted and the mixture becomes smooth and well combined. Immediately turn off the heat and remove the pan from the burner as soon as it’s smooth. Do not overcook.
- Divide Mixture: Then, carefully remove about one-third of the melted fudge mixture and transfer it into a separate heat-safe glass bowl. This portion will become your purple swirl.
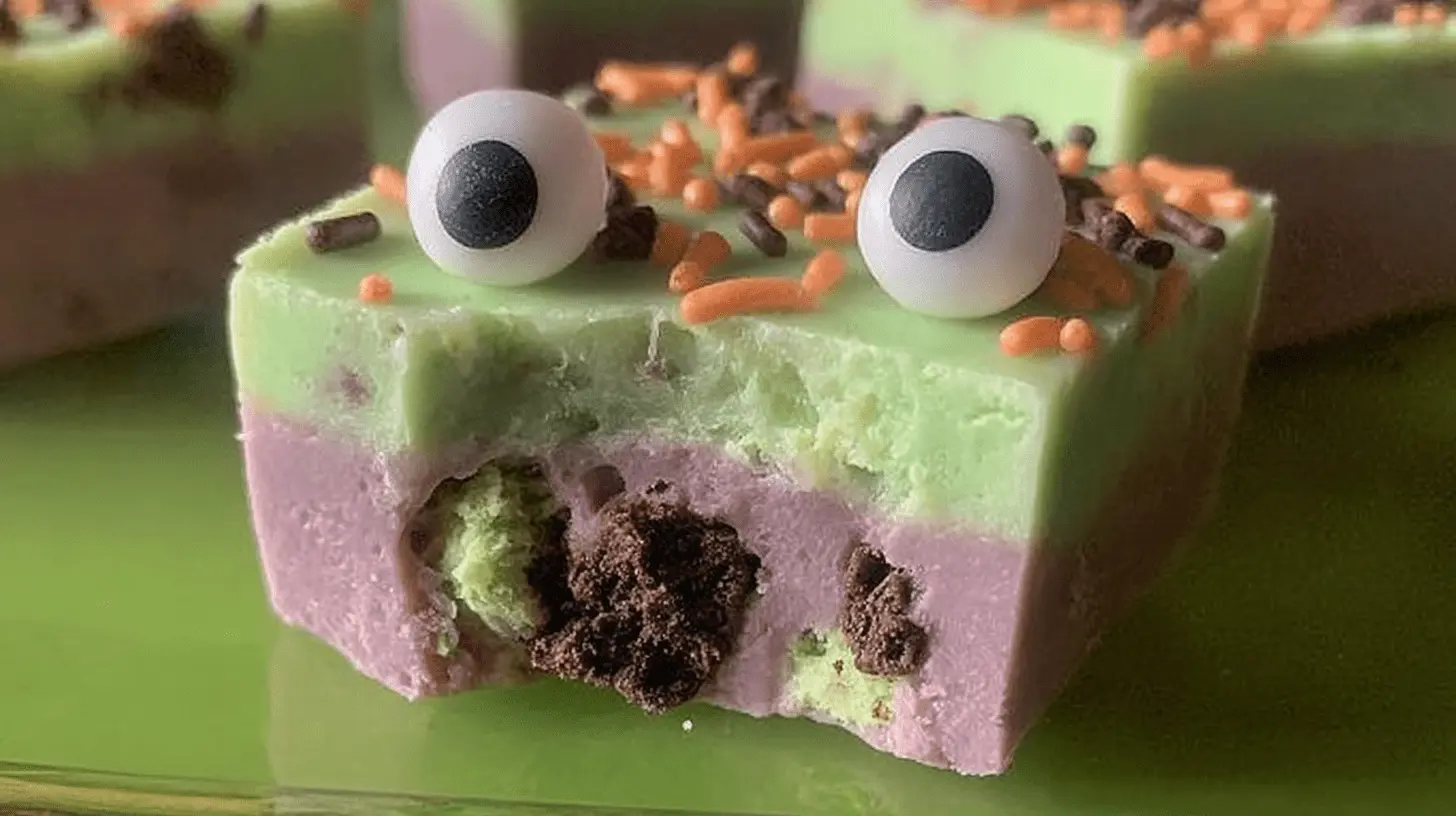
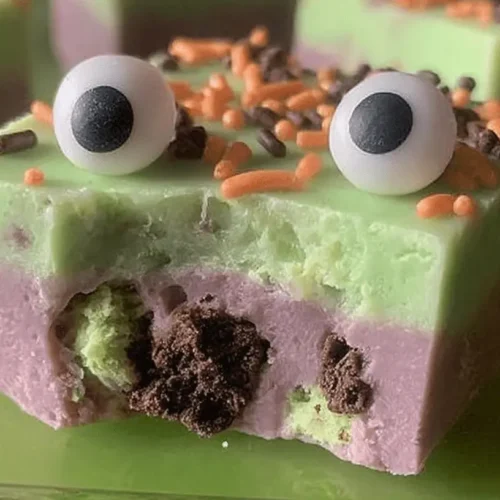
- Color Green: Simultaneously, add several drops of green gel food coloring to the larger portion of fudge remaining in the saucepan. Mix thoroughly with a clean metal spoon until you achieve a vibrant, uniform green color, resembling a bubbling cauldron.
- Color Purple: In the separate glass bowl, add several drops of purple gel food coloring to the smaller fudge mixture. Mix this with another clean metal spoon until it’s evenly colored a deep, mystical purple.
- Crush Oreos: Afterwards, take your packet of Oreos and roughly crush them. You can place them in a zip-top bag and crush them with a rolling pin or simply break them by hand.
- Add Oreos: Stir the crushed Oreos directly into the green fudge mixture in the saucepan. Ensure the cookies are evenly distributed throughout the green Witch’s Brew Fudge.
- Layer Green: Place the green Oreo fudge mixture into your prepared square tin. Spread it out evenly, but don’t worry about making it perfectly smooth; some texture adds to the spooky charm.
- Swirl Purple: After, dollop spoonfuls of the purple fudge mixture over the top of the green layer. Aim to distribute the purple fudge somewhat evenly over the green.
- Create Swirl: Using a knife or a skewer, gently swirl the purple fudge into the green layer. Move the knife through both layers in a figure-eight or zig-zag pattern to create a mystical, marbled effect. Make sure it is all pushed flat.
- Decorate: Add the edible candy eyes over the top of the swirled fudge while it is still soft. Then, generously sprinkle your Halloween sugar strands or other festive sprinkles across the entire surface.
- Chill Fudge: Now, place the tin into the refrigerator for at least 4 hours, or until the Witch’s Brew Fudge is completely firm and set. Chilling is essential for neat cutting.
- Cut & Serve: Finally, lift the fudge out of the pan using the parchment paper handles. Place it on a chopping board and use a sharp knife to cut it into desired square or rectangular pieces. Enjoy your spooky, sweet treat!
Pro Tips & Troubleshooting
Ensuring your Witch’s Brew Fudge turns out perfectly is easy with a few simple guidelines. These tips will help you avoid common issues and create a fantastic treat.
- Use Low Heat for Melting Chocolate: High heat can cause white chocolate to seize or burn, resulting in a grainy texture. Patience with low heat yields smooth fudge.
- Do Not Overcook Fudge: As soon as the mixture is smooth and combined, remove it from the heat. Continuing to cook it can make your fudge crumbly or hard.
- Chill Thoroughly for Clean Cuts: An insufficiently chilled fudge will be soft and difficult to cut neatly. Allow ample time in the fridge for a firm set.
- Ensure Ingredients Are Fresh: Always check the expiry dates on your condensed milk and chocolate for the best taste and consistency.
- Be Creative with Decorations: Halloween is about fun! Don’t hesitate to add extra edible glitter, spooky candy, or even a different color combo to your Witch’s Brew Fudge.
Serving, Storage, & Variations
Once your magical Witch’s Brew Fudge is ready, you’ll want to know the best ways to serve and store it. Plus, explore exciting variations to keep the Halloween fun going!
Serving Suggestions
- Spooky Platter: Arrange pieces of Witch’s Brew Fudge alongside other Halloween treats like ghost cookies and spiderweb cupcakes.
- Gift in Treat Bags: Wrap individual pieces in clear cellophane bags with festive ribbons for unique party favors or trick-or-treat alternatives.
- Party Dessert: Serve a tray of this colorful fudge at your next Halloween party for an easy and impressive dessert option.
Storage Instructions
- Airtight Container: Store your cooled and cut fudge in an airtight container to keep it fresh.
- Refrigerated for Up to 2 Weeks: Keep the container in the refrigerator; the fudge will remain delicious for up to two weeks.
- Freeze for Longer Storage: For extended freshness, wrap individual pieces tightly in plastic wrap and then place them in a freezer-safe bag or container. It will last for up to 3 months. Thaw in the refrigerator before serving.
Flavor & Decoration Variations
- Different Food Colors: Swap the green and purple for orange and black, or any other spooky color combination you desire.
- Mix in Crushed Halloween Candy: Add chopped candy corn, Reese’s Pieces, or even mini M&Ms for extra flavor and texture within the fudge base.
- Top with Chocolate Drizzle: Once the fudge is set, drizzle melted dark chocolate or white chocolate over the top for an extra touch of decadence.
- Use Different Cookie Types: Instead of Oreos, try crushed chocolate chip cookies or even graham crackers for a different flavor profile in your Witch’s Brew Fudge.
Nutrition Information
This Witch’s Brew Fudge is a delightful treat, perfect for indulging during the Halloween season. While it’s certainly a sweet confection, knowing the approximate nutritional values can help you plan your servings.
Please note that these are estimated values per serving and can vary based on specific brands of ingredients used and the size of your fudge pieces. Always refer to the packaging of your ingredients for the most accurate information.
| Nutrient | Estimated Value (per serving) |
|---|---|
| Calories | 175 kcal |
| Total Fat | 15-20g |
| Saturated Fat | 10-12g |
| Carbohydrates | 30-40g |
| Sugars | 25-35g |
| Protein | 3-5g |
FAQ
Can I use milk or dark chocolate instead of white chocolate?
Yes, you can. However, milk or dark chocolate will change the color and flavor profile, so you may need to adjust the amount of food coloring to achieve vibrant hues.
Why is my fudge too soft and not setting?
The most common reason is not chilling it long enough. Ensure you refrigerate the fudge for at least 4 hours, or until it is completely firm.
Can I make this ahead of time for a party?
Absolutely! This Witch’s Brew Fudge stores incredibly well. You can make it up to a week in advance and keep it in an airtight container in the refrigerator.
What if I don’t have gel food coloring, can I use liquid?
Liquid food coloring can be used, but you might need more to achieve the same vibrant colors. Gel colors are more concentrated and deliver better results for intense shades. Gel food coloring, often referred to as gel paste, is known for its ability to deliver more intense and vibrant colors with less product, as highlighted by Chefmaster, a leading brand in food coloring, on their blog. Understanding the different types of food coloring can help in achieving desired results in baking and confectionery.
Conclusion
There you have it – a wonderfully simple, incredibly spooky, and utterly delicious Witch’s Brew Fudge that’s perfect for Halloween. This no-bake recipe is a fantastic way to bring some magic into your kitchen, whether you’re a seasoned baker or just starting out. Get creative with your swirls and sprinkles, and enjoy creating a treat that’s as fun to make as it is to eat. We hope you and your loved ones have a happy, spooky Halloween filled with sweet delights!
Spooktacular Witch’s Brew Fudge Recipe
Equipment
- Square metal tin
- Parchment paper
- Saucepan
- Glass bowl
- Metal spoons
- Wooden Spoon
- Knife
- Chopping board
Ingredients
Fudge Base
- 500 g White Chocolate
- 397 g Condensed Milk
Mix-ins & Toppings
- 1 Packet Oreos (approx. 14 cookies)
- Green Food Colouring
- Purple Food Colouring
- Edible Eyes
- Halloween Sugar Strands/Sprinkles
Instructions
Preparation
- Line a square metal tin with parchment paper.
- Combine condensed milk and broken white chocolate in a saucepan over low heat.
- Stir until the mixture is fully melted, then immediately remove from heat.
Colouring & Mixing
- Transfer one-third of the melted mixture into a separate glass bowl.
- Add green food colouring to the mixture remaining in the pan and purple food colouring to the mixture in the glass bowl, stirring each with a separate metal spoon.
- Break up the Oreos and stir them into the green mixture in the pan using a wooden spoon.
Assembly & Chill
- Spoon the green Oreo mixture into the prepared tin, leaving some gaps.
- Fill the gaps with the purple mixture, then spread the entire surface flat with a knife.
- Decorate the top with edible eyes and Halloween sugar strands/sprinkles.
- Refrigerate the fudge for 4 hours until firm.
- Finally, cut the chilled fudge into individual pieces on a chopping board and enjoy.


