


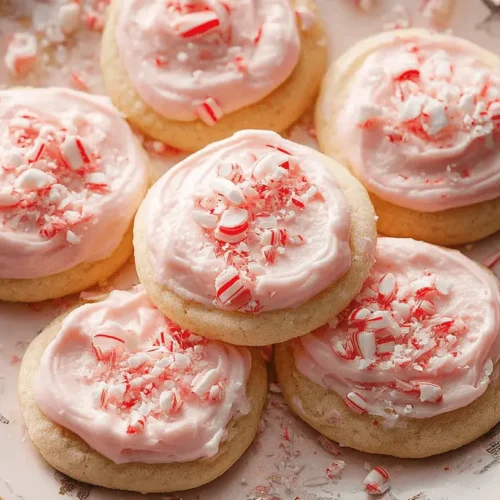
These Peppermint Meltaway Cookies are a dream for busy bakers. Buttery, soft, and lightly sweet, they melt in your mouth with every bite. They bring festive charm to holiday trays and gatherings, thanks to their delicate texture and peppermint kiss. The magic lies in the meltaway quality, built with cornstarch and confectioners’ sugar. A creamy peppermint buttercream frosting finishes each cookie with a peppermint-forward note that doesn’t overwhelm. Simple, cozy, and quick to assemble for chefs of any level.
Table of Contents
Why You’ll Love These Peppermint Meltaway Cookies
- Melt-in-Your-Mouth Texture: A soft, tender bite that dissolves rather than chewy.
- Perfect Peppermint Flavor: Peppermint notes in both cookie and frosting for balanced brightness.
- Easy to Make: One-bowl dough and straightforward buttercream keep it beginner-friendly.
- Quick Chill Time: Just 30 minutes of chilling keeps dough workable.
- Festive & Customizable: Ideal for holidays and easy to tailor with colors or garnishes.
Ingredients + Notes/Substitutions
For the Cookies and the Buttercream, you’ll keep this simple, breezy, and beginner-friendly.
- For the Cookies:
- Unsalted butter, softened
- Confectioners’ sugar
- Egg yolk, room temperature
- Pure vanilla extract
- Peppermint extract
- All-purpose flour, spooned & leveled
- Cornstarch
- Baking powder
- Salt
- For the Buttercream:
- Unsalted butter, softened
- Confectioners’ sugar
- Milk, room temperature (dairy or nondairy)
- Pure vanilla extract
- Peppermint extract
- Optional: Red or pink food coloring
- Crushed candy canes, for garnish
Notes & Substitutions
- Cornstarch is the secret to that light, meltaway texture. According to Bob’s Red Mill, cornstarch helps soften the rigid proteins in flour, creating a tender crumb that isn’t crumbly.
- The egg yolk adds binding and a bit of richness without weighing the cookie down.
- Keep butter and milk at room temperature for a smoother dough and creamier frosting.
- Gel food coloring yields vibrant, candy-like hues without thinning the frosting.
- If you don’t have candy canes, Andes mints or a fine crushed candy also work for garnishing.
Instructions
Make the cookie dough
- In a large bowl, beat the butter on medium until creamy, about 1 minute.
- Add confectioners’ sugar; beat on low for 30 seconds, then on medium-high for 2 minutes, until light and fluffy.
- Scrape as needed. Add egg yolk, vanilla, and peppermint extract; beat on high until combined.
- Add flour, cornstarch, baking powder, and salt; beat on low until the dough is thick and creamy.
- Cover and chill in the fridge for at least 30 minutes, up to 3 days. Chilling is mandatory for this creamy dough.
Prepare to bake
- Preheat oven to 350°F (177°C). Line large baking sheets with parchment or mats.
- Scoop dough into balls about 1 tablespoon (20–22 g). Place 3 inches apart; flatten slightly so each is just under 2 inches in diameter.
Bake the cookies
- Bake 13–14 minutes, until the edges appear set. The cookies won’t darken, so avoid over-baking.
- Remove from oven; cool on the sheet for 10 minutes, then transfer to a cooling rack to cool completely before frosting.
Make the buttercream
- In a mixer, beat butter on medium until creamy, about 1 minute.
- Add confectioners’ sugar, milk, vanilla, and peppermint extract; beat on low 30 seconds, then on medium-high for 2 minutes.
- Taste and adjust: thicken with more sugar, thin with more milk, or balance with a pinch of salt.
Tint and frost
- If desired, tint frosting with a tiny drop of red or pink coloring.
- Spread frosting onto cooled cookies with an icing spatula. Lightly sprinkle with crushed candy canes.
Storage
- Frosted cookies stay best at room temperature for about 1 day; refrigerate up to 5 days. Frosting will set after a few hours.
Pro Tips & Troubleshooting
- Room temperature ingredients ensure smooth dough and frosting.
- Do not overbake; pale cookies stay tender and melt away easier.
- Chill the dough properly to control spread and ensure a delicate texture.
- Flatten the dough balls to provide a stable surface for frosting.
- If frosting is too thick, add a splash of milk; if too thin, add a bit more confectioners’ sugar.
- Gel coloring keeps frosting vibrant without altering consistency.
Serving, Storage, & Variations
- Serving: Pair with hot cocoa or coffee for a festive treat.
- Storage: Frosted cookies keep at room temperature for 1 day, refrigerate up to 5 days.
- Make ahead: Chill unbaked dough up to 3 days.
- Freezing: Freeze unbaked dough balls up to 3 months.
- Variations:
- Mint Chocolate: Drizzle melted chocolate or add chopped Andes mints.
- Citrus Meltaways: Use lemon or orange extract instead of peppermint.
- Plain Vanilla: Omit peppermint for a classic vanilla version.
- Sprinkle Top: Swap candy canes for sprinkles or crushed candy toppings.
Nutrition
A general calorie estimate per cookie is provided as a guideline; with variations in size and frosting, values will differ. For precise numbers, use an online nutrition calculator.
| Item per Cookie | Calories | Fat (g) | Carbs (g) | Protein (g) |
|---|---|---|---|---|
| Peppermint Meltaway Cookie with Frosting | ~120–130 | 6–8 | 16–18 | 1–2 |
Note: These figures are estimates and can vary by ingredient brands and cookie size.
FAQ
Why are they called “meltaway” cookies?
he high confectioners’ sugar and cornstarch create a delicate texture that dissolves as you bite into it.
Can I make these without peppermint?
Yes, omit the peppermint extract for a vanilla-mint-free version or use another flavor extract.
Is chilling the dough really necessary?
Yes, mandatory for texture and to prevent spreading too much during baking.
Conclusion
Peppermint Meltaway Cookies deliver a unique, meltable bite and festive flavor that makes holiday baking uncomplicated and fun. The cookies’ light crumb and peppermint buttercream frosting come together with minimal effort, making them ideal for busy parents and beginners alike. Give them a try this season, then share your sweet creations in the comments or with friends and family. Your next baking moment just got brighter and easier.
Peppermint Meltaway Cookies
Equipment
- Handheld or Stand Mixer
- Paddle Attachment
- Large Bowl
- Baking Sheets
- Parchment Paper or Silicone Baking Mats
- Cooling Rack
- Knife or Icing Spatula
Ingredients
Cookie Dough
- 1 cup unsalted butter softened to room temperature
- 2/3 cup confectioners’ sugar
- 1 egg yolk at room temperature
- 1 teaspoon pure vanilla extract
- 1/2 teaspoon peppermint extract
- 2 cups all-purpose flour spooned & leveled
- 1/4 cup cornstarch
- 1 teaspoon baking powder
- 1/4 teaspoon salt
Peppermint Buttercream
- 6 Tablespoons unsalted butter softened
- 1 and 1/2 cups confectioners’ sugar
- 1–2 Tablespoons milk at room temperature (dairy or nondairy)
- 1/2 teaspoon pure vanilla extract
- 1/4 teaspoon peppermint extract
- 1 drop red or pink food coloring optional
- 1/4 cup crushed candy canes about 2–3 large candy canes
Instructions
Make the Cookie Dough
- In a large bowl, beat softened butter until creamy. Add confectioners’ sugar and beat until light and fluffy for 2 minutes, scraping the bowl as needed.
- Incorporate egg yolk, vanilla extract, and peppermint extract, beating on high speed until combined, scraping the bowl as needed.
- Add flour, cornstarch, baking powder, and salt, then beat on low speed until combined to form a thick, creamy dough.
- Cover the dough tightly and chill in the refrigerator for at least 30 minutes, and up to 3 days, as chilling is mandatory.
Bake the Cookies
- Preheat your oven to 350°F (177°C) and line large baking sheets with parchment paper or silicone baking mats.
- Scoop dough into 1 Tablespoon (20–22g) balls, place them 3 inches apart on baking sheets, and flatten each slightly to just under 2 inches in diameter.
- Bake for 13–14 minutes until the edges are set; cookies will not darken, so avoid over-baking.
- Remove from the oven and cool on the baking sheet for 10 minutes before transferring to a wire rack to cool completely.
Make the Buttercream & Finish
- Using a mixer, beat softened butter until creamy, then add confectioners’ sugar, milk, vanilla, and peppermint extracts.
- Beat on low for 30 seconds, then on medium-high for 2 minutes; adjust consistency with more sugar or milk, and add a pinch of salt to balance sweetness.
- Optionally, beat in 1 tiny drop of food coloring to tint the frosting.
- Spread frosting onto completely cooled cookies with a knife or spatula, then sprinkle each with crushed candy canes.
- Store frosted cookies covered at room temperature for up to 1 day or in the refrigerator for up to 5 days; the frosting will soft-set after a few hours.


