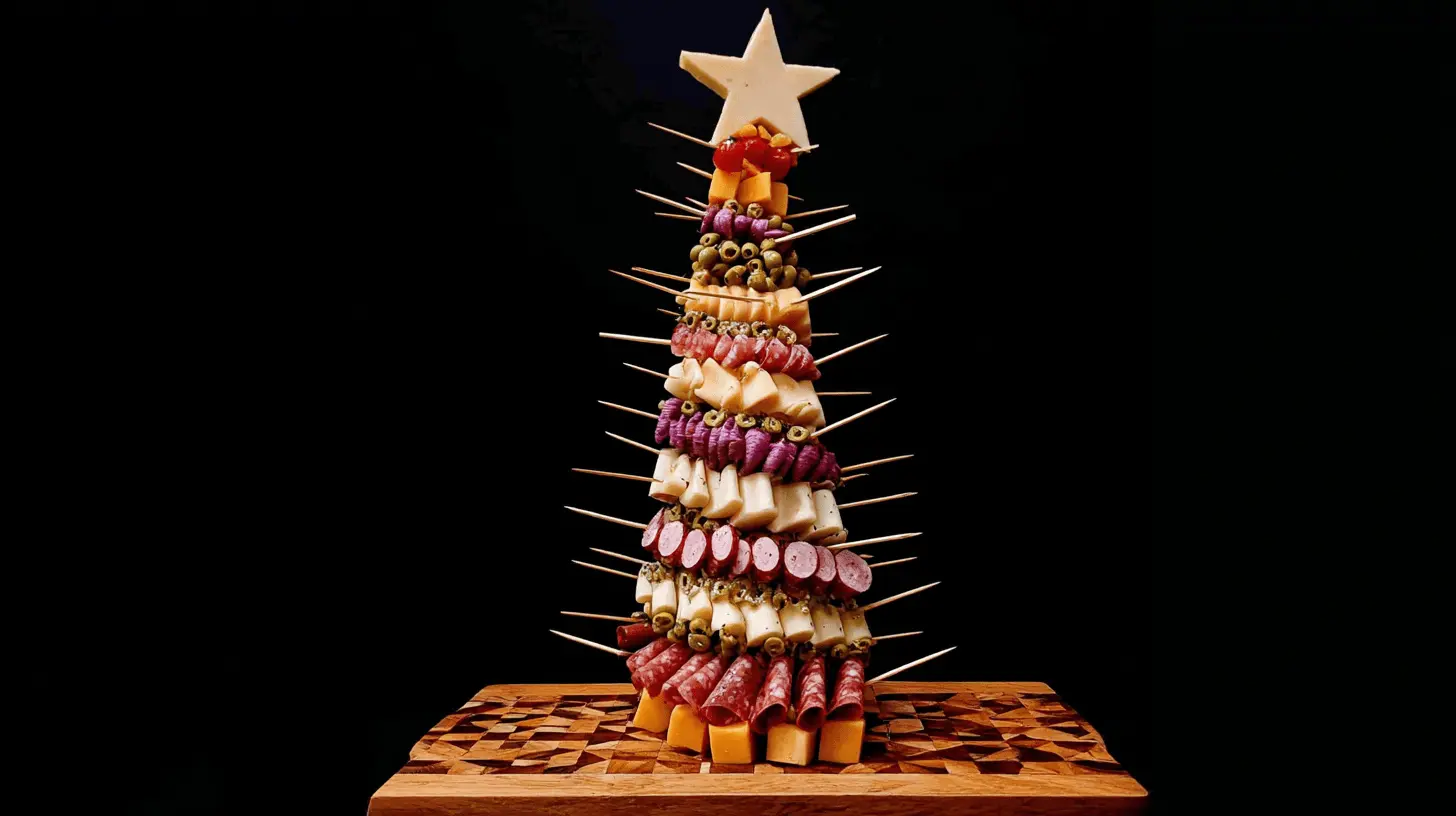
Ready to elevate your holiday spread? Discover how to create an impressive Charcuterie Tree, a unique and visually stunning vertical charcuterie board perfect for any festive gathering. This festive centerpiece is not only a showstopper but also incredibly simple to assemble, offering a naturally low-carb and keto-friendly option that delights every guest. Get ready to make your holiday entertaining effortless and elegant with this innovative appetizer.
Table of Contents
Why You’ll Love This Charcuterie Tree
This delightful holiday appetizer tree will quickly become your favorite for entertaining. It offers several compelling reasons to make it your go-to.
- Visually Stunning Centerpiece: A Charcuterie Tree instantly grabs attention and becomes the focal point of your spread.
- Fully Customizable Ingredients: Easily swap in your favorite meats, cheeses, and accompaniments to suit any taste.
- Naturally Low-Carb and Keto-Friendly: It focuses on protein and fats, making it ideal for various dietary preferences.
- Easy Individual Servings: Guests can effortlessly pick their desired items directly from the tree, minimizing mess.
- Ideal for Holiday Gatherings: Its festive shape and abundant offerings are perfect for seasonal celebrations.
Essential Ingredients for Your Charcuterie Tree
Building a magnificent Charcuterie Tree starts with selecting the right components. Focus on items that are firm and can hold their shape when skewered.
- Meats: Approximately 2 lbs of firm, varied cured meats. Think hard salami, pepperoni, or cooked summer sausage. Slice them into rounds or half-rounds.
- Cheeses: Roughly 2 lbs of various cheeses that hold their shape well, such as cheddar, colby jack, provolone, or Swiss. Cut these into uniform bite-sized cubes.
- Olives & Pickled Items: About 1 lb of assorted olives (green, black, Kalamata) and small pickled items like cornichons or cherry peppers. Ensure you drain them thoroughly.
- Fresh Produce & Herbs: Include vibrant elements like cherry tomatoes, small mozzarella balls, and sprigs of fresh rosemary for garnish. Rosemary also doubles as fragrant “pine needles” for your festive tree.
Notes & Substitutions
When selecting ingredients for your Charcuterie Tree, prioritize items that are sturdy and easy to skewer. If catering to dietary needs, offer gluten-free crackers or bread on the side rather than on the tree itself. Adjust the quantities of meats, cheeses, and olives based on the size of your styrofoam cone and the number of guests you expect to serve. Feel free to get creative with your selections; the goal is variety and visual appeal.
Step-by-Step Instructions
- Drain the brine from all olives and any other pickled items.
- Cut your cheeses into uniform, bite-sized cubes.
- Prepare your meats by slicing sausages into rounds; halve any with larger diameters.
- Wash and prepare any fresh produce as necessary.
- Remove packaging from the styrofoam cone and carefully wrap it entirely in plastic wrap or food-safe cellophane, ensuring no styrofoam is exposed, especially on the bottom.
- Set the wrapped styrofoam cone on your charcuterie plate; optionally, spread melted cream cheese on the bottom for stability.
- Spread your ingredients on baking sheets and insert a toothpick through each piece, ensuring it’s secure but a good portion remains exposed for guests.
- Attach ingredients to the tree piece by piece, starting from the bottom and working your way up.
- Create a bottom ring, then make a spiral of a “starter” item all the way up the tree, adding rows of other ingredients on either side, keeping them close to hide the cone.
- As you progress, end some lines of ingredients early, merge with others, and fill in any odd areas.
- Build the ingredients upwards towards the top, leaving only a small section at the very top open.
- Cut a thick slice of cheese or meat and use a cookie cutter or sharp knife to create a star shape.
- Affix the star to the top of the tree with one last toothpick, inserting it from the bottom of the star to hide it completely.
- If not serving immediately, wrap the finished tree with plastic wrap and store in the fridge until ready to serve.
To ensure the safety and quality of your appetizer, it’s always important to observe strict food safety guidelines when handling ingredients.
Pro Tips for Success
Achieving a perfect Charcuterie Tree is easy with a few expert tips. Always observe strict food safety and hygiene, especially when handling meats and cheeses. Prep all your ingredients in batches, refrigerating them between steps to keep them fresh. Assemble the tree as close to serving time as possible for optimal freshness and appearance. Lay down parchment paper on your work surface for easy cleanup. Lastly, keep a small bowl handy near the tree for guests to discard used toothpicks.
Serving, Storage, & Variations
This impressive Charcuterie Tree is designed for easy enjoyment and can inspire many creative twists.
Serving Suggestions
Enhance your Charcuterie Tree presentation by offering complementary dips and spreads in small mini ramekins placed around the base of the platter. Consider serving low-carb crackers or artisan bread on the side for those who prefer them. Decorate the platter base with extra garnishes like cranberries, nuts, or additional rosemary sprigs to create a fuller, more festive display.
Storage Instructions
If you have any delicious leftovers from your Charcuterie Tree, wrap them tightly in plastic wrap. Promptly refrigerate any remaining ingredients. For best quality and food safety, consume within 2-3 days, always noting the best-before dates for individual components. Discard any items that have been left at room temperature for more than two hours.
Creative Variations
Let your imagination run wild with your next Charcuterie Tree! Create an “all-olive” or “all-cheese” tree for specific preferences. Experiment with different holiday themes, perhaps a spooky Halloween tree with dark olives and orange cheeses, or a Valentine’s tree with heart-shaped items. You can also add different fresh fruits like grapes or berries, or even additional vegetables like cucumber slices or bell pepper strips, for extra color and freshness.
Nutritional Information
The estimated nutritional information for a Charcuterie Tree can vary significantly based on the specific types and quantities of ingredients you choose. This recipe is designed to be naturally lower in carbohydrates due to its focus on meats, cheeses, and olives.
Disclaimer: These values are estimates based on common charcuterie ingredients and a typical serving size. Please adjust values based on your specific ingredient choices and serving amounts.
| Nutrient | Amount |
|---|---|
| Calories | 403 kcal |
| Carbohydrates | 3 g |
| Protein | 21 g |
| Fat | 34 g |
| Saturated Fat | 15 g |
| Cholesterol | 81 mg |
| Sodium | 1676 mg |
| Fiber | 1 g |
| Sugar | 0.3 g |
Frequently Asked Questions (FAQ)
How far in advance can I make this Charcuterie Tree?
You can prepare and cut all your ingredients one day ahead and store them separately in the refrigerator. Assemble the full Charcuterie Tree a maximum of a few hours before serving to maintain freshness.
What if I don’t have a specific charcuterie ingredient?
Prioritize variety in texture and flavor when making your Charcuterie Tree. Substitute missing ingredients with similar sturdy alternatives that will hold well on a toothpick.
How many servings does a Charcuterie Tree provide?
The number of servings depends on the size of your cone and your guests’ appetites. Generally, an 18-inch cone will generously serve 10 or more people.
Conclusion
The Charcuterie Tree is a truly festive and easy-to-create appetizer that promises to be the star of your holiday table. Its impressive visual appeal, customizable nature, and simple assembly make it a perfect choice for any busy host. We hope this guide inspires you to create your own holiday masterpiece. Go ahead, gather your favorite meats and cheeses, and share your stunning Charcuterie Tree creation with friends and family this season!
Festive Charcuterie Tree: Your Ultimate Holiday Appetizer
Equipment
- Styrofoam cone
- Plastic wrap or food-safe cellophane
- Charcuterie plate
- Baking sheets
- Toothpicks
- Cookie cutter (star shape) or sharp knife
Ingredients
- Meats: Approximately 2 lbs of firm varied cured meats. Think hard salami, pepperoni, or cooked summer sausage. Slice them into rounds or half-rounds.
- Cheeses: Roughly 2 lbs of various cheeses that hold their shape well such as cheddar, colby jack, provolone, or Swiss. Cut these into uniform bite-sized cubes.
- Olives & Pickled Items: About 1 lb of assorted olives green, black, Kalamata and small pickled items like cornichons or cherry peppers. Ensure you drain them thoroughly.
- Fresh Produce & Herbs: Include vibrant elements like cherry tomatoes small mozzarella balls, and sprigs of fresh rosemary for garnish. Rosemary also doubles as fragrant “pine needles” for your festive tree.
Instructions
Instructions
- Drain the brine from all olives and any other pickled items.
- Cut your cheeses into uniform, bite-sized cubes.
- Prepare your meats by slicing sausages into rounds; halve any with larger diameters.
- Wash and prepare any fresh produce as necessary.
- Remove packaging from the styrofoam cone and carefully wrap it entirely in plastic wrap or food-safe cellophane, ensuring no styrofoam is exposed, especially on the bottom.
- Set the wrapped styrofoam cone on your charcuterie plate; optionally, spread melted cream cheese on the bottom for stability.
- Spread your ingredients on baking sheets and insert a toothpick through each piece, ensuring it’s secure but a good portion remains exposed for guests.
- Attach ingredients to the tree piece by piece, starting from the bottom and working your way up.
- Create a bottom ring, then make a spiral of a “starter” item all the way up the tree, adding rows of other ingredients on either side, keeping them close to hide the cone.
- As you progress, end some lines of ingredients early, merge with others, and fill in any odd areas.
- Build the ingredients upwards towards the top, leaving only a small section at the very top open.
- Cut a thick slice of cheese or meat and use a cookie cutter or sharp knife to create a star shape.
- Affix the star to the top of the tree with one last toothpick, inserting it from the bottom of the star to hide it completely.
- If not serving immediately, wrap the finished tree with plastic wrap and store in the fridge until ready to serve.


