

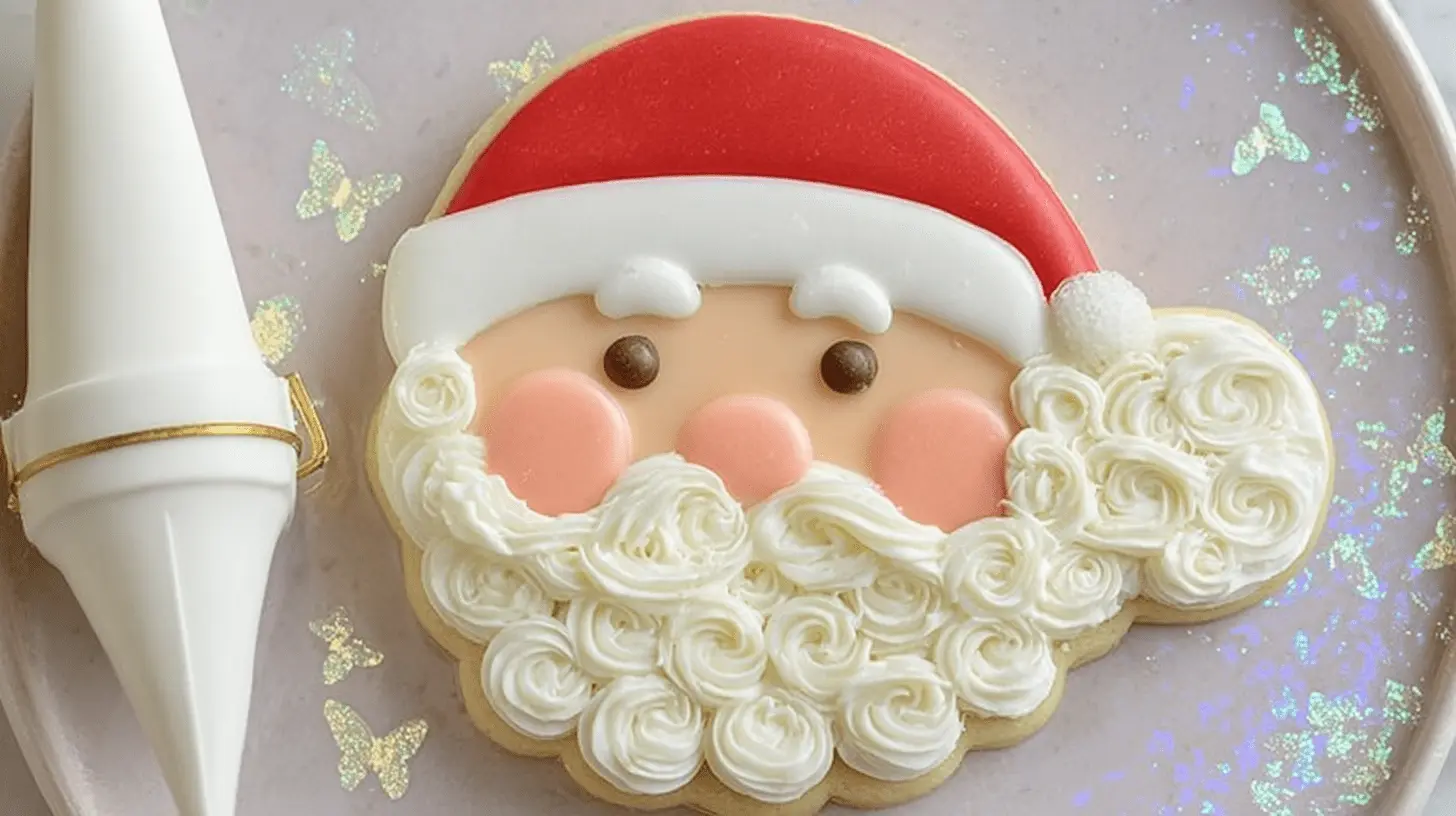
Bring joy to your holiday baking with delightful Santa Face Cookies! These festive treats are perfect for adding a touch of magic to any Christmas celebration. This guide will walk you through baking the perfect sugar cookies and decorating them with vibrant royal icing, step by step. Get ready to create edible works of art and spread holiday cheer!
Table of Contents
Why You’ll Love These Santa Face Cookies
Making these Santa Face Cookies offers so much fun and holiday spirit. They quickly become a cherished part of your festive traditions. You will absolutely adore crafting these cheerful Christmas treats.
- Perfect for holiday celebrations: These cookies bring a festive touch to any gathering.
- Fun and engaging activity for all ages: Kids and adults alike will enjoy the decorating process.
- Customizable with various colors/details: Get creative with Santa’s expressions and hat designs.
- Creates memorable Christmas treats: These edible gifts are always a hit.
- Impressive for gifts or parties: Show off your skills with these adorable creations.
Ingredients
To craft your adorable Santa Face Cookies, you’ll need a classic sugar cookie base and vibrant royal icing. Gather your supplies to ensure a smooth baking and decorating process.
For the Sugar Cookies (classic cutout recipe):
- 2 ½ cups All-purpose flour
- 1 cup (2 sticks) Unsalted butter, softened
- 1 cup Granulated sugar
- 1 Egg
- 1 teaspoon Vanilla extract
- 1 teaspoon Baking powder
- ½ teaspoon Salt
For the Royal Icing:
- 4 cups Powdered sugar (confectioners’ sugar), sifted
- 3 tablespoons Meringue powder
- ⅓ cup Warm water, plus more as needed
- ½ teaspoon Vanilla extract (optional)
Royal icing, often stabilized with meringue powder, provides a sturdy and smooth finish ideal for intricate cookie decorations.
Food Colorings (gel recommended for vibrancy):
- Super Red
- Bright White
- Super Black
- Ivory/Skin Tone (mix a tiny bit of brown with white, or use ivory gel)
- Bubblegum Pink (for cheeks)
Notes & Substitutions
You have flexibility with your cookie base. While a classic sugar cookie is ideal, you can use gingerbread or chocolate cookie dough for different flavor profiles. For icing, a stable buttercream can replace royal icing if you prefer a softer bite, though royal icing offers crisp lines and longer shelf life. Always opt for gel food coloring; it provides intense colors without watering down your icing. Adjust icing consistency by adding small amounts of powdered sugar for thicker icing or water for thinner icing.
Equipment
Having the right tools makes decorating Santa Face Cookies much easier and more enjoyable. These items ensure precision and efficiency.
- Large mixing bowls
- Electric mixer (stand or hand-held)
- Rolling pin
- Santa Face Cookie Cutter
- Baking sheets
- Parchment paper or silicone mats
- Tipless piping bags (at least 5 needed)
- Scribe tool or toothpick
- Small rubber spatulas
Step-by-Step Instructions: How to Make Santa Face Cookies
Creating these charming Santa Face Cookies involves two main parts: baking delicious sugar cookies and then transforming them with colorful royal icing. Follow these instructions carefully for the best results.
Part 1: Baking the Sugar Cookies
- Cream butter and sugar: In a large bowl, cream softened butter and granulated sugar with an electric mixer until light and fluffy.
- Add wet ingredients: Beat in the egg and vanilla extract until well combined.
- Combine dry ingredients: In a separate bowl, whisk together the flour, baking powder, and salt.
- Gradually add dry to wet: Slowly add the dry ingredients to the wet mixture, mixing on low speed until just combined. Do not overmix.
- Chill dough: Divide the dough in half, flatten each into a disk, wrap in plastic, and chill for at least 1-2 hours. This prevents spreading.
- Roll out and cut shapes: On a lightly floured surface, roll out one disk of chilled dough to ¼-inch thickness. Use your Santa Face Cookie Cutter to cut out shapes.
- Bake cookies: Place cutouts on baking sheets lined with parchment paper. Bake in a preheated oven at 375°F (190°C) for 8-10 minutes, or until edges are lightly golden.
- Cool completely: Transfer cookies to wire racks and let them cool completely before decorating.
Part 2: Preparing the Royal Icing
- Whip meringue powder and water: In a clean bowl, whisk meringue powder and warm water until frothy.
- Gradually add powdered sugar: Slowly add the sifted powdered sugar, mixing on low speed.
- Mix until stiff peaks: Increase speed to medium-high and beat for 5-7 minutes until stiff, glossy peaks form. If using, mix in vanilla extract.
- Divide and color icing: Divide the white icing into separate bowls. Color each batch with red, white, black, ivory, and pink gel food colorings.
- Adjust consistencies: For each color, adjust some icing to a thicker “outline” consistency (like toothpaste) and some to a thinner “flood” consistency (like shampoo). Use small amounts of water for flooding and powdered sugar for outlining.
- Prepare piping bags: Fill separate tipless piping bags with each color and consistency.
Part 3: Decorating Santa Face Cookies
Begin decorating your cooled Santa Face Cookies with careful steps to build layers.
- Outline white sections: Using white outline consistency icing, outline Santa’s hat pom-pom, hat trim, and beard (in a continuous swirling motion).
- Outline face: With ivory outline consistency icing, outline the face area.
- Flood hat trim: Add a squiggle of white outline icing in the hat trim, then flood with white flood consistency. Use a scribe tool to smooth and pop bubbles. Let dry 15-20 minutes.
- Flood beard: Fill Santa’s beard area with white flood consistency icing. Smooth with a scribe tool. Let dry 15-20 minutes.
- Flood face: Fill the face area with ivory flood consistency icing. Smooth it out.
- Outline hat: Outline Santa’s hat with red outline consistency icing.
- Flood hat: Fill the hat with red flood consistency icing, carefully defining the folds. Avoid piping right up to the crease, dragging the flood with your scribe tool instead.
- Pipe mustache: Pipe Santa’s mustache with white outline icing; fill it in for a puffy look. Allow to dry for 10-15 minutes.
- Pipe nose: Pipe a small dot for Santa’s nose with ivory outline icing. Use your scribe tool to shape it.
- Outline and fill eyebrows: With white outline icing, outline Santa’s eyebrows. Let dry a minute, then fill with white outline icing. Smooth with a scribe tool.
- Pipe cheeks: Pipe two small pink dots on Santa’s cheeks using pink outline consistency icing.
- Pipe eyes: Use black outline consistency icing to pipe two small dots for Santa’s eyes.
- Add beard texture: Pipe small swirls all over Santa’s beard with white outline icing for a whimsical texture.
- Fill hat pom-pom: Finish by filling the pom-pom on his hat with white outline consistency icing. Smooth and pop air bubbles.
- Full drying: Allow the decorated Santa Face Cookies to dry completely for 12-24 hours before stacking or packaging.
Pro Tips & Troubleshooting
Achieving perfect Santa Face Cookies requires patience and a few key techniques. Mastering icing consistency and drying times is crucial.
- Drying Time: Emphasize critical drying times between layers. Ensure previous layers are “crusted over” before adding new elements.
- Icing Consistency: For perfect outline consistency, the icing should hold a stiff peak but flow smoothly from the bag. Flood consistency should be thinner and settle within 10-15 seconds when dropped back into the bowl.
- Preventing Cratered Icing: Always add a small “squiggle” of outline icing to small flood areas, like hat trim, before filling. This provides support and prevents sinkholes.
- Scribe Tool Uses: Your scribe tool is invaluable for spreading icing evenly, guiding flood icing into corners, and popping any pesky air bubbles.
- Humidity: High humidity slows drying. Use a table fan or a dehydrator on its lowest setting for 10-15 minutes to speed up the process.
- Piping Control: Hold your piping bag at a 45-degree angle for outlining, letting the icing fall rather than pushing it. Practice on parchment paper first.
- Common Mistakes: To avoid running colors, allow sufficient drying time between adjacent colors. Prevent uneven drying by using a fan. Handle cookies gently to prevent breakage.
Serving, Storage, and Variations
These festive Santa Face Cookies are delightful on their own or paired with your favorite holiday beverages. Proper storage keeps them fresh and beautiful.
Serving Suggestions
Serve your beautifully decorated cookies with a glass of cold milk, a warm mug of hot cocoa, or a festive cup of coffee. They make wonderful edible gifts for neighbors, teachers, and friends. Arrange them on a holiday platter for a stunning centerpiece.
Storage
Store fully dried Santa Face Cookies in an airtight container at room temperature for up to two weeks. To prevent sticking, separate layers with parchment paper. You can also freeze undecorated sugar cookies for up to 3 months, then decorate them fresh later.
To ensure the safety of your homemade treats, review these important food safety guidelines for baking cookies.
Variations
- Flavor Profiles: Experiment with different cookie base flavors like spiced gingerbread, rich chocolate, or bright lemon for a unique twist.
- Decorating Embellishments: Once the royal icing is dry, add edible glitter, sanding sugar, or tiny nonpareils for extra sparkle and texture.
- Expression Variations: Change Santa’s mood by altering eye shapes (winking, sleepy) or adding a tiny smile or frown with black icing.
Nutrition (Estimated)
Please note that these nutritional values are estimated and can vary significantly based on specific ingredients, portion sizes, and any modifications to the recipe. This information is for general guidance only.
| Component | Amount (per cookie) |
|---|---|
| Calories | 200-250 kcal |
| Total Fat | 8-12 g |
| Saturated Fat | 5-7 g |
| Carbohydrates | 30-40 g |
| Sugars | 20-30 g |
| Protein | 2-3 g |
FAQ
You likely have a few questions about making these adorable Santa Face Cookies. Here are some quick answers to common queries.
- What kind of cookie is best for decorating? A sturdy, non-spreading sugar cookie recipe is ideal, as it holds its shape perfectly for detailed royal icing designs.
- How do I get the royal icing consistency right? Practice is key; aim for a toothpaste-like thickness for outlining and a shampoo-like consistency for flooding that settles in 10-15 seconds.
- How long do decorated Santa Face Cookies last? Once fully dried, these cookies can last in an airtight container at room temperature for up to two weeks.
- Can I make these cookies ahead of time? Absolutely! You can bake and freeze the undecorated cookies for up to three months, or prepare the royal icing a few days in advance.
- What if my icing colors bleed? Bleeding usually happens if layers are not fully dry or if too much liquid food coloring is used. Ensure ample drying time and use gel colors.
- Do I need a special Santa face cookie cutter? Yes, a dedicated Santa Face Cookie Cutter makes achieving the iconic shape much easier and consistent.
Conclusion
Creating Santa Face Cookies is a wonderful way to celebrate the holiday season. From baking the perfect sugar cookies to meticulously decorating each festive face, every step brings a little more joy into your home. Embrace the process, let your creativity shine, and enjoy sharing these delicious and adorable treats. Happy baking and a very merry Christmas to you!

Festive Santa Face Cookies: A Step-by-Step Decorating Guide
Equipment
- Santa Face Cookie Cutter
- Tipless Piping Bags
- Scribe tool or toothpick
- Baking pan
- Table fan (optional)
- Dehydrator (optional)
Ingredients
Main Ingredients
- Santa Face Cookie Cutter
- Royal Icing prepared to outline/piping and flood consistencies
- 4 Tipless piping bags
- Super Red Food Coloring
- Bright White Food Coloring
- Super Black Food Coloring
- Bubblegum Pink Food Coloring
- Scribe tool or toothpick
Instructions
Decorating Steps
- Ensure cookies are baked and fully cooled before starting decoration, and prepare your royal icing in outline/piping and flood consistencies, colored as specified.
- Using white outline consistency icing, carefully outline Santa’s hat pom-pom, hat trim, and beard, applying a continuous swirling motion for the beard.
- Next, use ivory outline consistency icing to create the outline for Santa’s face.
- Add a squiggle of white outline icing to the hat trim, let it dry briefly, then fill with white flood icing; smooth with a scribe tool and allow 15-20 minutes to dry.
- Fill Santa’s beard with white flood consistency icing, smoothing out air bubbles, and let it dry for 15-20 minutes to achieve design definition.
- Fill in Santa’s face area using ivory flood consistency icing, ensuring to smooth it with your scribe tool or toothpick.
- Outline the section for Santa’s hat with red outline consistency icing, preparing for the next step.
- Fill in the hat section with red flood consistency icing, carefully piping around the hat’s fold to maintain its defined outline.
- Pipe Santa’s mustache with white outline consistency icing, filling it in to create a puffy look, and allow it to dry for 10-15 minutes.
- Pipe a small dot for Santa’s nose using ivory outline consistency icing, lifting the bag straight up to form a nice shape, then gently adjust with a scribe tool.
- Outline Santa’s eyebrows with white outline consistency icing, let dry briefly, then fill and shape them using your scribe tool.
- Pipe two small dots on Santa’s cheeks with pink outline consistency icing for a rosy effect.
- Use black outline consistency icing to pipe two small dots for Santa’s eyes, bringing his face to life.
- Add small white outline consistency icing swirls all over Santa’s beard to create a fun, whimsical texture.
- Complete the cookie by filling the hat pom-pom with white outline consistency icing, smoothing it and popping any air bubbles for a clean finish.


