


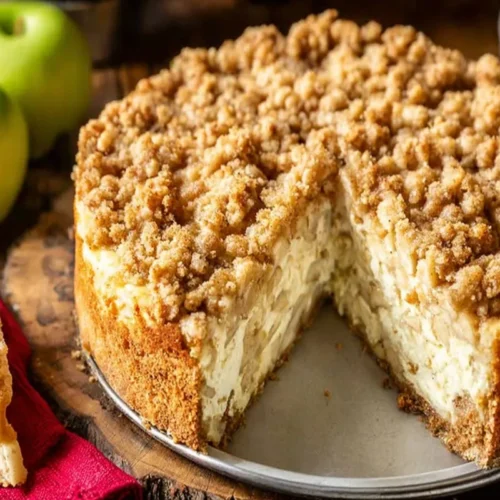
Welcome to the ultimate autumn dessert hybrid! This amazing Apple Pie Cheesecake masterfully combines the creamy richness of cheesecake with the warm, spiced comfort of a classic apple pie. Imagine tender cinnamon-spiced apples nestled atop a silky cheesecake and a crunchy oat crumble. This dessert is a true showstopper, perfect for holiday gatherings or any special occasion.
Table of Contents
Why You’ll Love This Apple Pie Cheesecake
This recipe takes the best of both worlds and makes them simple for busy home bakers. You’ll be thrilled with how easy and impressive it is!
- No water bath needed for the cheesecake! Enjoy perfectly creamy results without the fuss.
- Forget fussy pie crust rolling. Our graham cracker crust is quick to press into the pan.
- It’s the perfect use for fresh fall apples. Showcase seasonal produce in a delicious way.
- Impressive presentation, even easier preparation. Everyone will think you spent hours.
- Satisfies both pie and cheesecake cravings in one delightful slice. No need to choose!
Ingredients
Creating this incredible Apple Pie Cheesecake requires a few distinct layers, each adding to its decadent flavor. Always aim for quality ingredients for the best results.
For the Apple Filling:
- 2 lbs apples: peeled, cored, and finely chopped (see note)
- ⅔ cup light brown sugar: firmly packed
- 2 Tablespoons unsalted butter
- 2 teaspoons cornstarch
- ½ teaspoon ground cinnamon
- ⅛ teaspoon salt
- ½ teaspoon vanilla extract
For the Crumble Topping:
- ½ cup old-fashioned oats
- ⅓ cup all-purpose flour
- ¼ cup light brown sugar
- ¼ teaspoon baking soda
- ¼ teaspoon ground cinnamon
- ¼ teaspoon salt
- 4 Tablespoons unsalted butter: melted and cooled at least 10 minutes
For the Crust:
- 1 ½ cups graham cracker crumbs
- ⅓ cup finely chopped walnuts: (for nut-free, omit walnuts, no other changes needed)
- 2 Tablespoons granulated sugar
- 1 Tablespoon firmly packed light brown sugar
- 7 Tablespoons salted butter: melted
For the Cheesecake Batter:
- 24 oz cream cheese: softened, use brick-style full-fat cream cheese
- 1 cup granulated sugar
- ½ cup sour cream
- 1 teaspoon vanilla extract
- 3 large eggs: room temperature preferred
Notes & Substitutions
For the apple filling, firm, tart apples like Granny Smith, Honeycrisp, or a blend of both work best. Dicing the apples finely ensures they become perfectly tender and distribute evenly throughout the layers. Using brick-style, full-fat cream cheese is crucial for the ideal cheesecake texture and richness. According to baking experts, full-fat brick cream cheese provides a superior taste and texture compared to spreadable varieties. Sour cream adds a signature tang and velvety texture to the cheesecake. Ensuring your eggs are at room temperature helps create a smoother, more uniform batter and prevents lumps, as detailed by culinary science insights on baking with room temperature eggs. The walnuts in the crust are optional; simply omit them for a nut-free version without further adjustments.
Equipment
You’ll need just a few standard kitchen tools to bring this glorious Apple Pie Cheesecake to life.
- 9-inch springform pan: essential for easy removal and a beautiful presentation.
- Medium saucepan: for preparing the delicious apple filling.
- Mixing bowls: various sizes for different components.
- Electric mixer: a stand mixer or hand mixer makes quick work of the cheesecake batter.
- Slotted spoon: handy for straining excess liquid from the cooked apples.
- Foil-lined baking pan: prevents any potential leaks from the springform pan and makes cleanup easy.
Instructions
Let’s get baking! Follow these simple steps to create your magnificent Apple Pie Cheesecake. Remember to read through all instructions before you begin.
Prepare the Apple Pie Filling
In a medium or large-sized saucepan, combine the peeled, cored, and finely chopped apples, light brown sugar, unsalted butter, cornstarch, ground cinnamon, and salt. Heat the mixture over medium-low heat, stirring frequently until the butter is completely melted. Once melted, increase the heat to medium and bring the apple mixture to a gentle simmer. Simmer for about 5 minutes, continuing to stir frequently. The mixture should thicken slightly, and the apples should become tender when you pierce them with a fork. Remove the saucepan from the heat and stir in the vanilla extract. Pour the finished apple filling into a heatproof bowl and allow it to cool completely. You can place it in the fridge and stir occasionally to speed up the cooling process.
Make the Crumble Topping
In a medium-sized mixing bowl, combine the old-fashioned oats, all-purpose flour, light brown sugar, baking soda, ground cinnamon, and salt. Whisk these dry ingredients together until they are well combined. Add the cooled melted butter to the flour mixture. Use a fork to combine the wet and dry ingredients. Do not over-mix; the mixture should still be clumpy. Set this crumble topping aside while you prepare the remaining layers of your Apple Pie Cheesecake.
Prepare the Crust
Preheat your oven to 325°F (165°C). In a medium-sized bowl, combine the graham cracker crumbs, finely chopped walnuts (if you’re using them), granulated sugar, and light brown sugar. Stir these dry ingredients together thoroughly. Add the melted salted butter to the mixture and stir until the butter is well incorporated and all the crumbs are moistened. Press the crust mixture evenly onto the bottom and slightly up the sides of your 9-inch springform pan. Use the bottom of a glass or your hands to ensure it is firm and compact. Set the prepared crust aside.
Make the Cheesecake Batter
In a large mixing bowl, use an electric mixer to combine the softened cream cheese and granulated sugar. Beat on medium-low speed until the mixture is smooth, creamy, and completely free of lumps. Avoid over-beating or whipping too much air into the batter, but ensure it is uniform and smooth. Scrape down the sides and bottom of the bowl periodically to ensure everything is fully incorporated. Add the sour cream and vanilla extract to the cream cheese mixture and stir on low speed until they are just combined. Lightly beat one large egg in a separate small bowl, then add it to the cheesecake batter. Stir on low speed until it is just combined. Repeat this process with the remaining two eggs, adding them one at a time. After each egg, scrape down the sides and bottom of the bowl to ensure all ingredients are evenly blended.
Assemble & Bake
Pour about half of the prepared cheesecake batter over the pressed crust in your springform pan. Using a slotted spoon to drain any excess juice, layer about half of the cooled apple filling evenly over the cheesecake batter. Next, pour the remaining cheesecake batter over the apple layer, gently spreading it to cover. Top this with the remaining strained apples, ensuring they are distributed evenly. Finally, scatter the crumble topping evenly over the apples. If your crumble has solidified while sitting, simply break it up with your hands before scattering.
Place the springform pan on a foil-lined baking pan; this helps catch any potential drips and makes cleanup easier. Transfer the pan to the center rack of your preheated 325°F (160°C) oven. Bake for 60-70 minutes. Dark-colored pans tend to bake faster, while lighter-colored pans might take a bit longer. Your Apple Pie Cheesecake is finished when, if slightly jostled, the edges are mostly set, but the center still gently jiggles like a firm Jell-O. Do not overbake!
Allow the cheesecake to cool completely to room temperature in a warm, draft-free place. You can use the top of your oven or turn your oven off, crack the door several inches, and let it sit for about an hour before removing it to cool further on the counter. Once at room temperature, transfer the cheesecake to the refrigerator and chill for at least 6 hours, preferably overnight, before slicing and serving. This extended chill time is crucial for the cheesecake to fully set and achieve its perfect creamy texture.
Pro Tips for Success
Achieving a perfect Apple Pie Cheesecake is easy with these helpful hints. Avoid overmixing the cheesecake batter once the eggs are added; this prevents cracks and ensures a creamy texture. Do not overbake your cheesecake; a slight jiggle in the center is ideal for a rich, custardy result. Always ensure all your dairy and eggs are at room temperature, as this helps create a smooth, lump-free batter. Pre-cooking the apples beforehand ensures they are perfectly tender and flavorful. Finally, chilling the cheesecake completely before slicing is crucial for clean, beautiful slices and the best eating experience.
Serving, Storage & Variations
Serve your chilled Apple Pie Cheesecake with a dollop of fresh whipped cream or a drizzle of warm caramel sauce for an extra touch of indulgence. Store any leftover cheesecake covered tightly in the refrigerator for up to 5 days. You can also freeze individual slices or the whole cheesecake, tightly wrapped in plastic wrap and then foil, for up to 3 months. Thaw frozen slices overnight in the refrigerator before serving. Feel free to experiment with different apple varieties, such as Fuji or Gala, for subtle flavor differences in the filling. For a different nutty flavor in the crust, substitute pecans for walnuts.
Nutrition Information
This rich and satisfying Apple Pie Cheesecake offers a delightful balance of flavors and textures.
| Nutrient | Amount |
|---|---|
| Serving Size | 1 serving |
| Calories | 615 kcal |
| Carbohydrate Content | 64 g |
| Protein Content | 7 g |
| Fat Content | 38 g |
| Saturated Fat Content | 21 g |
| Trans Fat Content | 1 g |
| Cholesterol Content | 136 mg |
| Sodium Content | 421 mg |
| Fiber Content | 3 g |
| Sugar Content | 49 g |
| Unsaturated Fat Content | 13 g |
Disclaimer: These are estimated nutritional values per serving and may vary based on specific ingredients and preparation methods.
Frequently Asked Questions (FAQ)
Can I use pre-made apple pie filling for this recipe?
We highly recommend making the homemade apple filling for the best flavor and texture. If you must use store-bought, ensure you strain any excess liquid to prevent the cheesecake from becoming watery.
Can this Apple Pie Cheesecake be made in advance?
Absolutely! This cheesecake actually tastes best when prepared a day ahead, as it allows all the flavors to meld and the cheesecake to set perfectly. It lasts well for up to 5 days in the fridge.
How can I tell when it’s finished baking?
The cheesecake is done when its edges appear set, but the very center still has a slight, gentle jiggle when the pan is moved. Overbaking can lead to a dry or cracked cheesecake.
Conclusion
This Apple Pie Cheesecake truly delivers the best of both beloved desserts in one spectacular creation. With its creamy texture, tender spiced apples, and crunchy crumble, it’s guaranteed to be a hit at any gathering. We hope you enjoy making and sharing this showstopping dessert. Give this recipe a try and share your delicious results with us!
Decadent Apple Pie Cheesecake Recipe
Equipment
- Saucepan
- Heatproof bowl
- mixing bowl
- fork
- Springform pan (9-inch)
- Electric mixer
- slotted spoon
- Foil lined baking pan
Ingredients
Apple Filling
- 2 lbs apples peeled, cored, and finely chopped
- ⅔ cup light brown sugar firmly packed
- 2 Tablespoons unsalted butter
- 2 teaspoons cornstarch
- ½ teaspoon ground cinnamon
- ⅛ teaspoon salt
- ½ teaspoon vanilla extract
Crumble
- ½ cup old fashioned oats
- ⅓ cup all-purpose flour
- ¼ cup light brown sugar
- ¼ teaspoon baking soda
- ¼ teaspoon ground cinnamon
- ¼ teaspoon salt
- 4 Tablespoons unsalted butter melted and cooled at least 10 minutes
Crust
- 1 ½ cups graham cracker crumbs
- ⅓ cup finely chopped walnuts for nut-free, omit walnuts, no other changes needed
- 2 Tablespoons granulated sugar
- 1 Tablespoon light brown sugar firmly packed
- 7 Tablespoons salted butter melted
Cheesecake Batter
- 24 oz cream cheese softened, use brick-style full-fat cream cheese
- 1 cup granulated sugar
- ½ cup sour cream
- 1 teaspoon vanilla extract
- 3 large eggs room temperature preferred
Instructions
For the apple filling
- Combine apples, brown sugar, butter, cornstarch, cinnamon, and salt in a saucepan; heat over medium-low, stirring until butter melts.
- Increase heat to medium, bring to a simmer for 5 minutes, stirring frequently, until thickened and apples are tender.
- Remove from heat, stir in vanilla, and pour into a heatproof bowl to cool.
For the crumble
- In a medium bowl, combine oats, flour, sugar, baking soda, cinnamon, and salt.
- Add melted butter to the dry mixture and combine with a fork until clumpy; set aside.
For the crust
- Preheat oven to 325F (165C).
- In a medium bowl, mix graham cracker crumbs, walnuts, and sugars.
- Stir in melted butter until crumbs are moistened, then press evenly onto the bottom and up the sides of a 9-inch springform pan.
For the cheesecake batter
- In a large bowl, use an electric mixer to beat softened cream cheese and granulated sugar on medium-low speed until smooth and creamy, scraping the bowl often.
- Add sour cream and vanilla extract, then stir on low speed until just combined.
- Lightly beat and add eggs one at a time, mixing on low speed until just combined after each addition, ensuring the batter is uniform.
Assembly
- Pour half of the cheesecake batter over the prepared crust in the springform pan.
- Using a slotted spoon, layer half of the drained apple mixture over the batter, then pour the remaining cheesecake batter on top.
- Top with the remaining strained apples and scatter the crumble evenly over the surface, breaking up any solidified clumps.
- Place the pan on a foil-lined baking sheet and bake at 325F (160C) for 60-70 minutes, until edges are set and the center jiggles slightly.
- Cool to room temperature in a warm, draft-free place, then transfer to the refrigerator and chill for at least 6 hours or preferably overnight before slicing.
Notes
Avoid overmixing the crumble to maintain its clumpy texture.
When preparing the cheesecake batter, mix cream cheese and sugar until smooth, but do not over-beat to prevent too much air from incorporating, which can lead to cracks.
Proper cooling is essential for a perfectly set cheesecake. Allow it to cool gradually to room temperature before chilling in the refrigerator for at least 6 hours, or preferably overnight.


