

Embrace the cozy spirit of autumn with a dessert that’s as delightful to make as it is to eat! These Pumpkin Patch Dirt Cups are a fantastic way to celebrate the season with your family. We take classic Oreo “dirt” and creamy chocolate pudding, then transform them into an adorable pumpkin patch theme, complete with candy pumpkins and fun printable truck signs. This recipe is incredibly simple and perfect for little hands to help assemble. Get ready to craft a sweet, festive treat that everyone will adore!
Table of Contents
Why You’ll Love These Pumpkin Patch Dirt Cups
These delightful Pumpkin Patch Dirt Cups are sure to become a family favorite for many reasons:
- They are effortlessly festive, bringing autumn cheer to any table.
- You’ll love how quick they are to prepare, requiring minimal fuss and time.
- This recipe uses common pantry ingredients you likely already have on hand.
- Kids absolutely adore helping to make and, of course, devour them!
- They are the perfect individual treat for fall parties, school events, or family gatherings.
- The rich, creamy chocolate pudding base makes them irresistibly delicious.
Ingredients
Gather these simple ingredients to create your charming Pumpkin Patch Dirt Cups:
- Instant chocolate pudding mix: 6.8 ounces (2 boxes), for a quick and easy base.
- Cold milk: 4 cups, essential for setting the pudding.
- OREO sandwich cookies: 14 ounces, crushed to create the signature “dirt.”
- Candy pumpkins: 24 pieces, for decorating your tiny pumpkin patches.
- Fall leaf sprinkles (optional): Add extra autumnal flair.
- Green food coloring (optional): For a vibrant “grass” layer.
Notes & Substitutions
- Pudding: Feel free to use any brand of chocolate instant pudding. Vanilla or white chocolate pudding also work wonderfully for a different flavor profile.
- Homemade Pudding: If you prefer, prepare a scratch-made chocolate pudding for an extra special touch. Just ensure it’s fully chilled and set before assembly.
- Cookies: Chocolate graham crackers are a great alternative to OREO cookies. Any chocolate sandwich cookie will do!
- Milk: Dairy milk works best for traditional pudding, but you can use non-dairy alternatives like almond or oat milk if preferred. Check pudding mix instructions for best results.
- Toppings: Get creative with other fall-themed candies like candy corn, gummy worms, or even chocolate shavings for more texture.
- Gluten-Free/Dairy-Free: Use gluten-free chocolate cookies and a dairy-free instant pudding mix (ensure it’s compatible with non-dairy milk) to accommodate these dietary needs.
Equipment
You’ll need a few basic kitchen tools to assemble your Pumpkin Patch Dirt Cups:
- Small clear serving cups: 12-16 cups, perfect for showcasing the layers.
- Large mixing bowl: For preparing your pudding.
- Whisk: To ensure your pudding is smooth and lump-free.
- Food processor or Ziploc bag: For crushing the OREO cookies.
- Printer: (Optional) To print our cute pumpkin patch truck labels.
- Scissors: (Optional) To cut out the circular truck labels.
- Tape: (Optional) To secure labels to toothpicks.
- Toothpicks: (Optional) To hold the decorative labels.
Instructions
Creating your Pumpkin Patch Dirt Cups is incredibly straightforward and fun. Follow these steps for a delicious fall treat:
- Prepare the Pudding: In a large mixing bowl, whisk together the instant chocolate pudding mix and cold milk for about 2 minutes. Continue whisking until the mixture starts to thicken.
- Chill Pudding: Place the pudding in the refrigerator for at least 5-10 minutes, or until it is firm and scoopable. This is crucial for achieving distinct layers.
- Crush OREO Cookies: Open your package of OREO cookies. If using a food processor, pulse until you achieve fine, even crumbs that resemble dirt. If you don’t have a food processor, place cookies in a large Ziploc bag, seal it, and crush them using a rolling pin or the back of a spoon until fine crumbs form.
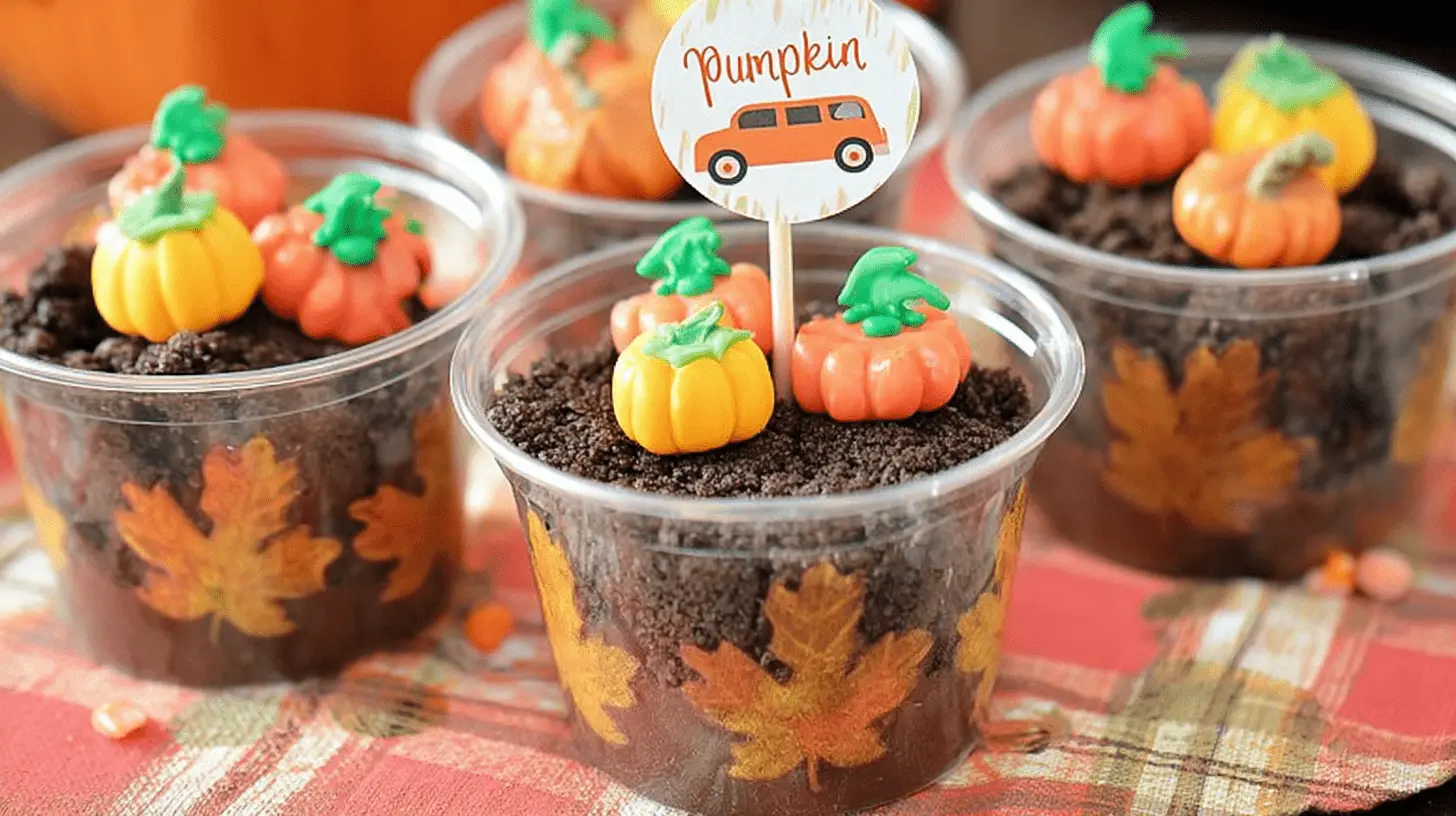
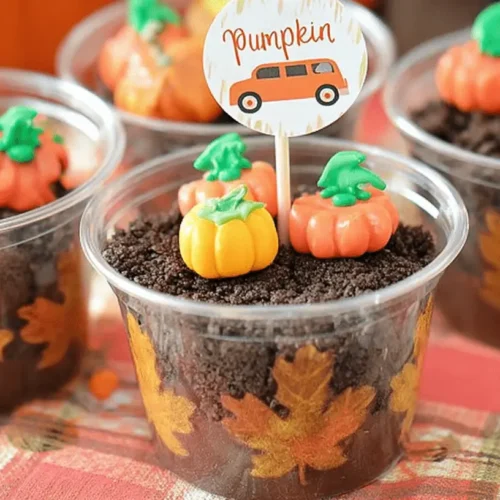
- First Pudding Layer: Spoon a layer of the thickened chocolate pudding into the bottom of each clear serving cup. Aim for about one-third of the cup’s height.
- First Cookie Layer: Evenly sprinkle a generous layer of crushed OREO cookies over the pudding in each cup. This creates your first “dirt” layer.
- Repeat Layers: Add another layer of chocolate pudding on top of the cookie crumbs, followed by another layer of crushed OREO cookies.
- Final Cookie Layer: Finish each cup with a final, thick layer of OREO crumbs, ensuring the top looks like a freshly tilled pumpkin patch.
- Decorate with Toppings: Place 1-2 candy pumpkins on top of the OREO “dirt” in each cup. If desired, sprinkle with fall leaf sprinkles for extra charm. You can also add a few drops of green food coloring to a small portion of pudding for a “grass” layer before the final “dirt.”
- Prepare Labels (Optional): If you are using our printable labels, print them out first.
- Cut Out Labels (Optional): Carefully cut out the circular pumpkin patch truck labels using scissors.
- Attach Labels (Optional): Use a small piece of tape to secure each cut-out label onto the top of a toothpick.
- Insert Labels (Optional): Gently insert the toothpick labels into the center of your Pumpkin Patch Dirt Cups.
- Refrigerate: Place the assembled dirt cups back into the refrigerator to chill for at least 30 minutes before serving. This allows the flavors to meld and ensures they are perfectly cold.
Pro Tips for Perfect Pumpkin Patch Dirt Cups
Crafting the perfect Pumpkin Patch Dirt Cups is easy with these helpful hints:
- Chill Pudding Fully: Ensure your chocolate pudding is completely chilled and set before layering. This prevents layers from blending prematurely.
- Use Clear Cups: Clear cups aren’t just for aesthetics; they allow you to see the beautiful “dirt” and pudding layers, enhancing the fun!
- Fine Crumbs are Key: Crush your OREO cookies into fine, even crumbs. This creates the most realistic “dirt” texture.
- Assemble Right Before Serving: For the freshest taste and best texture, assemble these Pumpkin Patch Dirt Cups 1-2 hours before serving.
- Get Kids Involved: Let your little ones help with crushing cookies or decorating the tops. It makes the process even more enjoyable.
- Green Grass Layer: For an extra touch of realism, mix a few drops of green food coloring into a small amount of pudding for a “grass” layer.
- Prevent Soggy Cookies: Make sure your pudding is thick enough. If it’s too thin, your cookie layers might become soggy too quickly.
Serving, Storage, and Variations
Make the most of your Pumpkin Patch Dirt Cups with these tips:
- Serving: Serve these delicious dirt cups well-chilled. They are an ideal individual dessert for fall parties, Halloween gatherings, or a cozy family night.
- Storage: Cover any leftover Pumpkin Patch Dirt Cups tightly with plastic wrap or an airtight lid and refrigerate. They will stay fresh and delicious for 2-3 days.
- Make Ahead: For best results, assemble your dirt cups 1-2 hours before serving. If making further in advance, you can prepare the pudding and crush the cookies separately, then layer them closer to serving time.
- Different Pudding: Experiment with vanilla, white chocolate, or even butterscotch pudding for unique flavor combinations in your fall dirt cups.
- Fruit Layers: Add thin slices of bananas or berries between the pudding and cookie layers for a burst of freshness and color.
- Whipped Topping: Include a layer of whipped cream or cool whip in addition to or instead of one of the pudding layers for a lighter, airier texture.
- Seasonal Themes: This base recipe is incredibly versatile! Adapt it for other holidays by changing the candy toppings (e.g., gummy worms for Halloween, candy canes for Christmas, jelly beans for Easter).
- Adult Version: For a grown-up treat, add a splash of coffee liqueur or Irish cream to your chocolate pudding for an extra depth of flavor.
Nutrition Information
Please remember that the following nutrition information for these Pumpkin Patch Dirt Cups is an estimate. Actual values may vary based on specific brands used, ingredient quantities, and any substitutions made. This data is for one serving.
| Nutrient | Amount |
|---|---|
| Calories | 416 kcal |
| Carbohydrate Content | 68 g |
| Protein Content | 7 g |
| Fat Content | 14 g |
| Saturated Fat Content | 5 g |
| Polyunsaturated Fat Content | 2 g |
| Monounsaturated Fat Content | 6 g |
| Trans Fat Content | 0.03 g |
| Cholesterol Content | 15 mg |
| Sodium Content | 599 mg |
| Potassium Content | 356 mg |
| Fiber Content | 2 g |
| Sugar Content | 47 g |
| Vitamin A Content | 199 IU |
| Calcium Content | 163 mg |
| Iron Content | 6 mg |
For detailed information on nutritional values of various ingredients, consult the USDA FoodData Central database.
Consider using sugar-free pudding or reduced-fat cookies to make a slightly lighter version. For dietary restrictions, choose gluten-free cookies and dairy-free pudding/milk alternatives as discussed in the substitutions section.
Frequently Asked Questions (FAQ)
- Can I use homemade pudding for these Pumpkin Patch Dirt Cups?
Absolutely! Homemade chocolate pudding works wonderfully. Just ensure it is fully chilled and set before you begin assembling your cups. - How far in advance can I make these?
You can assemble these dirt cups 1-2 hours before serving for the best texture. They will store well in the fridge for up to 2-3 days, though the cookies may soften over time. - What if I don’t have a food processor?
No problem! Place the OREO cookies in a large Ziploc bag, seal it, and crush them with a rolling pin or the back of a spoon until fine crumbs form. - Can I use other cookies besides Oreos?
Yes, any chocolate sandwich cookie or even chocolate graham crackers can be used to create the “dirt” layer for your autumn dirt dessert. - Are these good for school parties?
These individual Pumpkin Patch Dirt Cups are absolutely perfect for school parties! They are easy to transport, require no utensils if eaten from the cup, and are always a hit with kids.
Conclusion
These Pumpkin Patch Dirt Cups are the ultimate easy, fun, and flavorful treat for the fall season. With their simple preparation, kid-friendly assembly, and irresistible chocolate-and-cookie layers, they are guaranteed to bring smiles to everyone’s faces. Whether you’re hosting a festive gathering or just enjoying a cozy afternoon at home, these delightful dirt cups are the perfect way to celebrate autumn. Give this recipe a try and share your wonderful creations with us – we can’t wait to see your adorable pumpkin patch treats!
Pumpkin Patch Dirt Cups: Easy & Fun Fall Treat!
Equipment
- Food Processor
- Plastic Cups
- Toothpicks
Ingredients
Main Ingredients
- 6.8 ounces instant chocolate pudding mix (2 boxes)
- 4 cups milk
- 14 ounces Oreos
- 24 pieces candy pumpkins
Instructions
Preparation
- Stir together the instant chocolate pudding mix and milk until well combined, then refrigerate to chill and thicken.
- Process the chocolate sandwich cookies in a food processor until they form fine crumbs.
- Spoon the thickened pudding into individual plastic cups and top each with a layer of cookie crumbs.
- Decorate the cups with sprinkles and arrange candy pumpkins on top to create a pumpkin patch scene.
- For extra decoration, cut out printed pumpkin patch circles, tape them to toothpicks, and insert them into the pudding cups.
- Chill the assembled dirt cups until ready to serve for the best texture and enjoyment.


